
Automating with Workflows
The Generate panel, the Canvas and the Video panel each cover a common job well. Workflows are for everything else. A workflow is a recipe of processing steps that you assemble yourself: generate an image, then upscale it, cut out its subject, place it on a background, run it through a second model, repeat it for a list of prompts, and so on. Once built, a workflow runs with one press of Invoke and can be reused, adjusted and shared.
Use a workflow when you want to:
- Chain steps together that would otherwise take several trips through different panels, such as generating an image and then compositing it onto another.
- Use features the panels do not expose, including community-contributed nodes.
- Repeat a process exactly, on new prompts or images, without redoing it by hand.
- Share a process with others as a single file.
Nodes and connections
Section titled “Nodes and connections”A workflow is made of nodes connected into a graph. Each node performs one operation, such as loading a model, encoding a prompt, denoising, decoding an image, or resizing it. Everything InvokeAI does is built from nodes, including what the Generate panel does behind the scenes.
A node has:
- Outputs, listed at the top of the node, with connection points on its right edge.
- Inputs, listed below the outputs, with connection points on its left edge. Most inputs also have a control for entering a value directly, such as a text box, number or model picker.
You build a workflow by dragging from an output of one node to an input of another. The connection passes the output’s value along, and the input’s own control is replaced by Provided by connection. Connection points and lines are colored by the kind of value they carry, such as images, latents, conditioning, numbers or text, and only compatible points can be connected. An input marked with a red * is required: the workflow cannot run until it has a value or a connection.
When you press Invoke, InvokeAI works out the order to run the nodes from their connections, runs them, and saves the images from the nodes you chose to the Gallery.
A tour of the workflow editor
Section titled “A tour of the workflow editor”Workflows are built and run in the Automate layout (Alt+4). The editor fills the center, the workflow’s form is on the left, and the Gallery and Queue are on the right.
Hover over a numbered circle, or tap it on a touchscreen, for a short description.
| Part | What it does | |
|---|---|---|
| 1 | Workflow panel | The workflow’s form: its most important settings as simple controls, like a Generate panel for this workflow. |
| 2 | View / Edit | View uses the form. Edit lets you design the form, edit the workflow’s details (name, description, author, tags, notes), and inspect the selected node. |
| 3 | Editor toolbar | Tools for panning, box and lasso selection, and erasing nodes or connections; Zoom in, Zoom out and Fit view; Download workflow as PNG; and Node opacity. |
| 4 | Workflow name | The active workflow. Click it to open the Workflows library. |
| 5 | Workflow actions | Add node (+), Save to library…, the save status, settings, and the ⋯ menu with Workflow details…, Rename workflow…, Import workflow JSON…, Export workflow JSON, New workflow and more. |
| 6 | The graph | The workflow’s nodes and connections. Drag nodes by their title bar; scroll to zoom; drag empty space to pan. |
| 7 | Minimap | An overview of the whole graph for finding your way around large workflows. |
| 8 | Gallery and Queue | Where results appear, with the Queue, Preview and Image Map on the right-hand rail. |
| 9 | Automate | The layout preset for workflows. |
| 10 | Invoke | Runs the active workflow. The routing control beside it shows the source (Workflow) and the destination (Gallery). |
The essentials
Section titled “The essentials”- Add a node by pressing Shift+A or Space in the editor, or with the + button in its header, then search for it by name.
- Connect nodes by dragging from an output on the right of one node to an input on the left of another.
- Choose which images are kept. Only nodes with Save to Gallery checked, at the bottom of image nodes, send their images to the Gallery.
- Manage workflows from the Workflows library: click the workflow’s name in the editor’s header.
The Workflow Editor Reference covers all of this in detail, along with connectors, the library, common node patterns, community nodes and keyboard shortcuts.
Walkthrough: put a generated subject on a background
Section titled “Walkthrough: put a generated subject on a background”The Generate panel can make a picture of a fox, but it cannot then cut the fox out and place it on a photo of your choice. This walkthrough builds a workflow that does both: it generates a subject with SDXL on a plain white background, then uses the Image Compositor node to remove the white and composite the subject onto a background image. Finally, it gives the workflow a simple form.
You need an SDXL model and an SDXL VAE, such as the sdxl-vae-fp16-fix starter model, installed from the Model Manager, and a background image in the Gallery.
1. Start from the SDXL text-to-image workflow
Section titled “1. Start from the SDXL text-to-image workflow”-
Press Alt+4 for the Automate layout.
-
Click the workflow’s name at the top of the editor to open the Workflows library, go to Browse, and open Text to Image - SDXL. A copy is added to your project and becomes the active workflow.
-
In the Main Model - SDXL node, choose your SDXL model in Model, and in the VAE Model node choose an SDXL VAE.
-
In the Positive Prompt node, describe the subject on a plain background, for example a red fox sitting, full body, on a plain white background. A plain, evenly lit background is what lets the Compositor cut the subject out cleanly.
This workflow already contains the SDXL text-to-image chain: the model loader, positive and negative prompts, random seed and noise, Denoise - SD1.5, SDXL, and Latents to Image - SD1.5, SDXL, which turns the result into an image.
2. Add the Image Compositor
Section titled “2. Add the Image Compositor”-
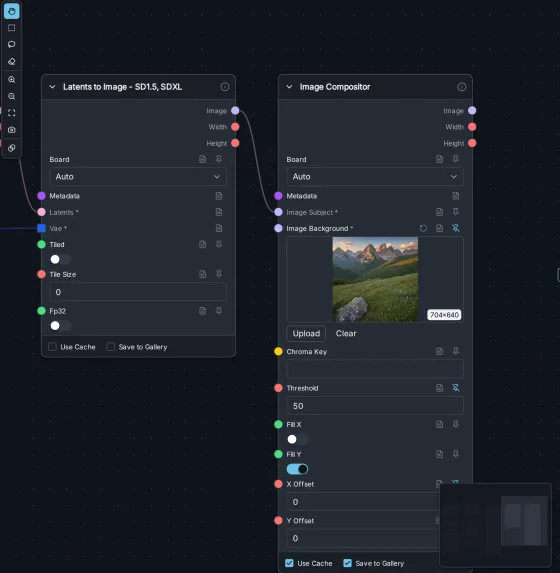
Press Space and type compositor, then click Image Compositor to add it. Drag it to the right of Latents to Image.
-
Connect the Image output of Latents to Image to the Image Subject input of Image Compositor.
-
In Image Background, click Choose image and pick a background from the Gallery, drag one onto it from the Gallery, or Upload a file.
-
Check Save to Gallery at the bottom of Image Compositor, so the finished composite is saved. Uncheck it on Latents to Image, unless you also want to keep the plain subject.
3. Run it
Section titled “3. Run it”Press Invoke. The nodes light up in turn as they run, and the composited image appears in the Gallery. Press Invoke again for a new variation: the workflow’s Random Seed node picks a new seed each time.
The default settings rarely give a clean cut-out on the first try. SDXL models usually add a soft shadow under the subject, even with shadow in the negative prompt. The Compositor’s default flood fill, which spreads inward from the corners of the subject image, stops where the white turns to the shadow’s light grey, so the shadow and sometimes a pale halo are pasted onto the background. To clean them up, set Chroma Key to white and raise Threshold to about 80, as in the example below, and run it again. Every near-white pixel then becomes transparent, including the faint shadow.
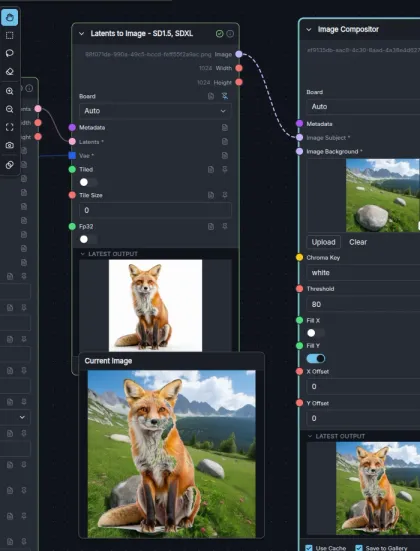
In summary, the Image Compositor’s settings are:
- Threshold (default 50) sets how different from the background color a pixel must be to count as part of the subject. Raise it if a white halo or shadow remains around the subject; lower it if parts of the subject disappear.
- Chroma Key removes a specific color everywhere instead of flood-filling from the corners. Enter a color such as
whiteor#00ff00. This also removes faint shadows and background showing through gaps in the subject. Leave it empty to use the flood fill. - Fill Y (on by default) scales the subject to the height of the background; Fill X scales it to the width. Keep at least one of them on unless the two images are exactly the same size. With both on, the subject is stretched to the background’s shape.
- X Offset and Y Offset move the subject, in pixels. Positive values move it right and up. A subject moved past an edge reappears on the opposite side.
4. Build a form for the workflow
Section titled “4. Build a form for the workflow”A workflow with a dozen nodes is not the most convenient thing to use day to day. The form in the Workflow panel on the left gathers the settings you actually change into one simple panel, like the Generate panel.
To add a setting to the form, click the pin icon at the right end of its row in the node (Expose in Linear UI form). Only settings with their own control can be pinned; connected inputs cannot.
-
The SDXL workflow already puts its Positive Prompt, Negative Prompt, Model, VAE and board settings in the form.
-
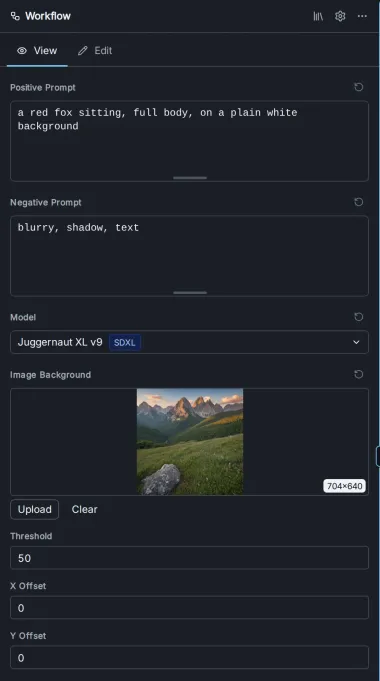
In Image Compositor, pin Image Background, Threshold, X Offset and Y Offset. The pins turn blue, and the settings appear at the end of the form.
-
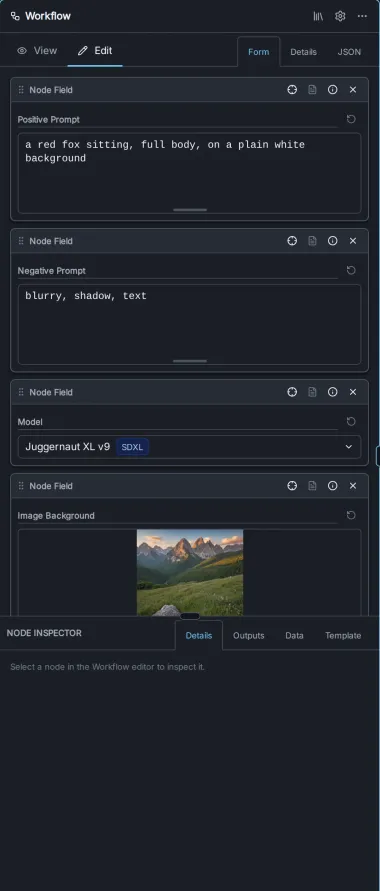
In the Workflow panel, click Edit, then Form. Each setting is a card:
- Drag a card’s title bar to reorder it.
- Type in Field label to give it a clearer name, such as Background for Image Background.
- Click ✕ (Remove from form) to take out settings you do not need, such as the VAE and board.
- Add form element adds a Heading, Text, a Divider, or a row or column container to group settings.
-
Click View to use the form.
In View, the form works like any generation panel: change the prompt or the background and press Invoke. The form is part of the workflow, so it is saved with it, exported with it, and shown to anyone who opens your workflow.
5. Save and share it
Section titled “5. Save and share it”Use Details in the Workflow panel’s Edit mode to give the workflow a name and description, then click Save to library… in the editor’s header to keep it in your library for other projects. To share it, choose Export workflow JSON from the ⋯ menu.
Learn more
Section titled “Learn more”- Workflow Editor Reference — nodes, connections, the library, common node patterns and shortcuts in detail.
- Loop Nodes — repeat steps over lists of prompts, images or values.
- Face Tools Nodes — find, mask and edit faces in a workflow.
- Community Nodes and the Custom Node Manager — add nodes written by the community.
- Migrating from ComfyUI — how familiar ComfyUI nodes map to InvokeAI’s.