
Layers panel guide
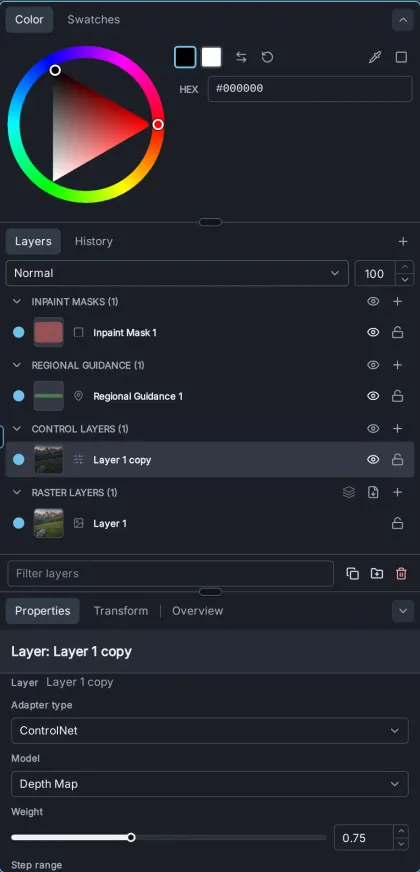
The Layers panel sits to the right of the Canvas in the Edit layout. It has three parts, from top to bottom:
- Color — the color picker and swatches used by the painting tools.
- Layers and History — the canvas’s layers, or its undo history.
- Properties, Transform and Overview — the settings of the active tool and of the selected layer.
Drag the dividers between the parts to resize them, and use the chevron at the right of the Color and Properties tabs to collapse them. The sizes are saved with the project.
For an introduction to the layer types, see Crafting images with the Canvas.
The Color tab edits the two painting colors: the Foreground color, which the brush and text use, and the Background color. Click a chip to choose which one you are editing.
- The color wheel, or a box picker via Switch to box picker, and a field for the value. The format button cycles through hex, RGB, HSL and HSB.
- Swap foreground and background colors (X) and Reset colors to black and white (D).
- Pick a color from the canvas — the eyedropper. You can also hold Alt on the canvas. A magnifying loupe shows the pixel under the pointer and its RGB values; see the Canvas guide.
- When an inpaint mask or regional guidance layer is selected, a third chip, Mask tint, edits the color of its overlay.
The Swatches tab has built-in Swatches, your Recent colors, and the Project palette: click + (Add current color to palette) to save a color with the project, and right-click a swatch to remove it.
Layers
Section titled “Layers”The layer list
Section titled “The layer list”Layers are grouped into four stacks: Inpaint Masks, Regional Guidance, Control Layers and Raster Layers. Within a stack, higher layers are drawn over lower ones. Click a stack’s header to collapse it. Its buttons add a New layer of that type and, for masks, regional guidance and control layers, Hide all or Show all. The Raster Layers header also has Merge visible and Export to PSD.
Each row shows, from left to right:
- A colored stripe, if you gave the layer a color label.
- A dot that turns the layer on or off (Enable/disable layer). A disabled layer takes no part in generation.
- A thumbnail, the layer type and the name.
- An eye button (Show/hide layer) on masks, regional guidance and control layers. It only hides the layer from view; a hidden layer still affects generation.
- A lock button (Toggle lock), which prevents editing.
Rows can have child rows, shown with a chevron: adjustments and regenerate regions on raster layers, noise and denoise limits on inpaint masks, and reference images on regional guidance layers. Select a child row to edit it in Properties.
Working with layers
Section titled “Working with layers”- Add a layer with the + button next to the Layers and History tabs, or by right-clicking empty space in the list. The new layer is placed above the selected one and selected.
- Select a layer by clicking it. Ctrl-click adds or removes layers from the selection, and Shift-click selects a range.
- Rename a layer by double-clicking its name or pressing F2. Enter saves and Escape cancels.
- Reorder layers by dragging them, or with Alt+↑ and Alt+↓. Layers can only move within their own stack.
- Blend mode and Opacity, in the row above the list, apply to the selected layer. There are 16 blend modes, from Normal and Multiply to Color and Luminosity.
- Group layers into folders with Group selected layers, or Ctrl+G on the canvas. Alt+→ moves a layer into the group above it and Alt+← moves it out. A group’s dot, eye and lock apply to everything in it.
- Filter layers at the bottom of the list shows only the layers whose names match.
- The buttons beside the filter Duplicate selected layers, Group selected layers and Delete selected layers.
History
Section titled “History”The History tab lists the canvas’s edits, oldest first, with the current step highlighted and undone steps in italics. Click a step to go back or forward to it, or use the Undo and Redo buttons (Ctrl+Z, and Ctrl+Shift+Z or Ctrl+Y).
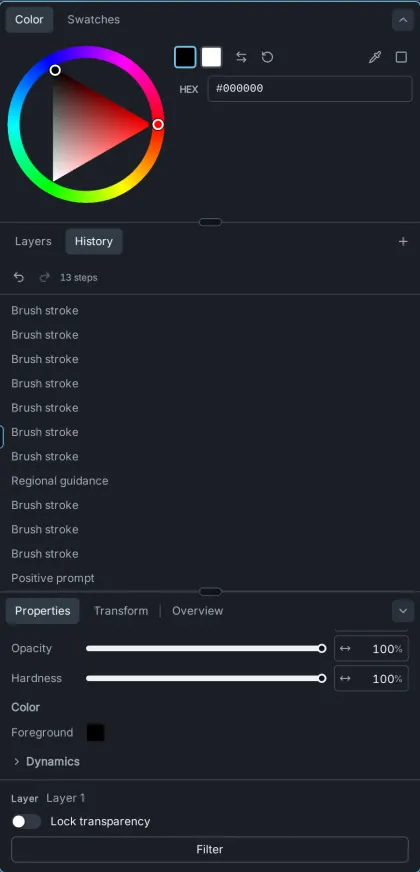
The history keeps the last 64 steps. It lasts only while the project is open in your browser: reloading the page, or starting a new canvas, clears it.
The layer menu
Section titled “The layer menu”Right-click a layer, or select it and press Shift+F10, for its menu. Right-clicking the canvas opens the same menu for the selected layer.
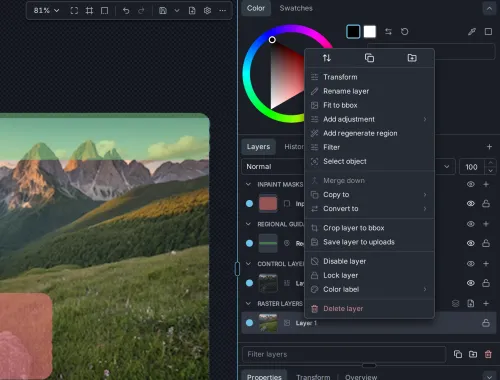
The icons at the top Arrange the layer (move it to the front, forward, backward or to the back), Duplicate layer and Group layers. Below them:
- For every layer:
- Rename layer and Fit to bbox (scale the layer to fit inside the generation frame).
- Merge down.
- Copy to — including Copy layer to clipboard, and copies to other layer types.
- Crop layer to bbox and Save layer to uploads (save it to the Gallery’s Uploads).
- Disable layer, Lock layer and Color label.
- Delete layer.
- Raster layers:
- Transform.
- Add adjustment — Brightness/Contrast, Exposure, Levels, Curves, Saturation, Hue or Invert. Adjustments are non-destructive and appear as child rows.
- Add regenerate region — treats the layer’s own shape as an inpaint mask.
- Filter, Select object and Run workflow — process the layer; see the Canvas guide.
- Boolean operations — combine the layer with the one below: intersect, cut out, cut away or exclude.
- Convert to — make it a control layer, inpaint mask or regional guidance layer. Text, shape and gradient layers can also be rasterized into plain pixels.
- Control layers: Transform, Filter, Select object, Run workflow, Enable transparent preview, and Convert to raster layer.
- Inpaint masks: Add noise, Add denoise limit, Extract masked area (copy the masked part of the image to a new layer), and Hide layer.
- Regional guidance: Enable auto-negative, Add reference image, and Hide layer.
When several layers are selected, the menu also offers Merge selected layers.
Properties
Section titled “Properties”A heading at the top of the Properties tab names what it is editing: Layer: or Group: followed by the selected layer’s or group’s name, Operation: followed by the operation’s name while a Filter or Select Object operation runs, or No layer selected. It stays in view as you scroll, so you can always tell which layer the settings below belong to.
Below the heading, the tab shows up to three sections, in this order:
- The running operation’s settings — while a Filter or Select Object operation is running. Starting either from a layer’s menu opens the Layers panel on this tab.
- Tool — the options of the active canvas tool; see the Canvas guide.
- Layer — the settings of the selected layer.
The Layer section is dimmed while results are being staged or a canvas generation is running.
Raster layer
Section titled “Raster layer”- Lock transparency — paint only where the layer already has pixels, leaving transparent areas transparent, like Photoshop’s “Lock transparent pixels”. Use it to recolor a shape without spilling paint around it, or to refine a subject painted on a transparent layer without growing its outline. Brushes, shapes and pen input all respect the lock.
- Filter — start the Filter operation.
Adjustment child rows each have their own settings, such as Brightness and Contrast, Exposure, Levels and Curves with a channel selector, Saturation, and Hue. A regenerate region has a Fill color and Fill style.
Control layer
Section titled “Control layer”- Adapter type — ControlNet, T2I Adapter, Control LoRA or Z-Image ControlNet, depending on the model selected in the Generate panel.
- Model — the installed control models of that type for the same model family. If the list is empty, install one from the starter models.
- Weight — how strongly the guide is followed (0 to 2; the default is 0.75 for ControlNet).
- Step range — the part of the generation, from start to finish, in which the guide applies.
- Control mode (ControlNet only) — Balanced, More prompt, More control or Unbalanced.
- Transparent preview — shows the layer semi-transparently over the image.
- Filter — process the layer’s image into a guide, such as an edge or depth map.
The control image is the layer’s own pixels. To use a picture, copy or convert a raster layer, or drop a gallery image on Add as Control Layer.
Inpaint mask
Section titled “Inpaint mask”- Fill color and Fill style (Solid, Grid, Crosshatch, Diagonal, Horizontal or Vertical) — how the mask is drawn on screen.
- Invert mask — swap the masked and unmasked areas.
Its child rows, added from the layer menu, set Noise (noise added inside the mask before generating, 25% by default) and Denoise limit (the most the masked area may change, 80% by default).
Regional guidance
Section titled “Regional guidance”- Positive prompt and Negative prompt — the prompts for this region. Each is saved when you click away from the field. The negative prompt is shown only for models that use one.
- Auto-Negative — also uses the region’s positive prompt as a negative prompt outside the region.
- Fill color, Fill style and Invert mask, as for inpaint masks.
If the selected model does not support regional guidance, a message says that the layer is skipped during generation.
Regional reference image
Section titled “Regional reference image”A regional guidance layer’s reference image is a child row. Select it to set:
- The image: Choose image from the Gallery, drop a gallery image on it, or Upload a file.
- Model — an IP-Adapter (SD 1.5, SDXL) or FLUX Redux (FLUX.1) model.
- For IP-Adapter, Method (Full, Style, Composition, Style (strong) or Style (precise)) and Weight. For FLUX Redux, Image influence.
Transform and Overview
Section titled “Transform and Overview”The Transform tab sets the selected layer’s Position, Scale and Rotation as numbers. Each change is a separate undoable step.
The Overview tab shows a thumbnail of the whole canvas with the visible area outlined. Click it to move the view.
Keyboard shortcuts
Section titled “Keyboard shortcuts”In the layer list:
| Shortcut | Action |
|---|---|
| ↑ / ↓, Home / End | Move between layers |
| → / ← | Expand / collapse, or go to the parent group |
| Enter or Space | Select |
| F2 | Rename |
| Delete / Backspace | Delete the layer |
| Ctrl+C | Copy the layer to the clipboard |
| Alt+↑ / Alt+↓ | Move the layer up / down |
| Alt+→ / Alt+← | Move into the group above / out of its group |
| Shift+F10 | Open the layer menu |
| Ctrl+Z / Ctrl+Shift+Z | Undo / redo |
On macOS, use Cmd in place of Ctrl. More layer shortcuts, such as duplicate, merge and arrange, work while the canvas has focus; see the Canvas guide.