
Workflow Editor Reference
This page describes working in the workflow editor in detail. For an introduction to workflows, a tour of the editor and a step-by-step walkthrough, see Automating with Workflows.
Working in the editor
Section titled “Working in the editor”Adding and connecting nodes
Section titled “Adding and connecting nodes”To add a node, press Shift+A or Space in the editor, or click + (Add node) in the editor’s header. Type to search: every word you type must appear in the node’s name, type, tags or category. Nodes are grouped by category, each with a short description and the node pack it comes from; nodes still in development are marked with a hammer icon (Beta). Click a node to add it near the middle of the view.
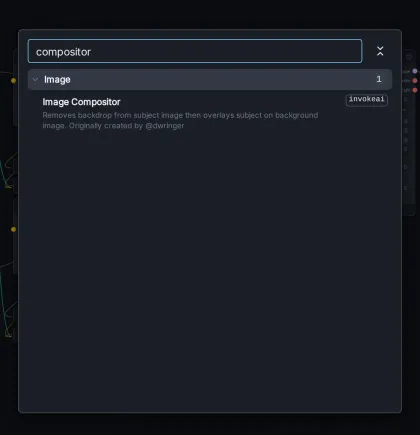
A quicker way to add a node that is already connected: drag from a connection point and release it over empty space. The picker opens showing only the nodes that can connect to that point, and the new node is wired up for you.
To connect two nodes, drag from an output on the right of one node to an input on the left of another. Only compatible connection points accept the connection. An input takes one connection, but an output can feed as many inputs as you like. To reconnect, drag the end of a connection to another point; to disconnect, drag it away and release it over empty space, or select the connection and press Delete.
Right-click a node to Copy, Paste, Duplicate, Collapse or Delete it, and double-click its title to rename it. The chevron in a node’s title bar collapses it to keep a large graph tidy.
The picker’s Utility group has three special nodes:
- Notes — a sticky note for explaining a workflow to others, or to yourself later.
- Current Image — shows the image being generated and the latest result, for keeping an eye on long workflows.
- Connector — a small dot for rerouting connections (see below).
Connectors
Section titled “Connectors”Connectors tidy up the wiring of a large graph. They pass a value straight through and are removed before the workflow runs, so they cannot change what it does. To add one, right-click empty space in the editor and choose Add connector, then connect to and from it. You can wire a connector’s output first and its input later; it only accepts a source whose type matches what it feeds. Deleting a connector joins its incoming connection directly to everything it fed.
A node’s border shows its state: red when a required input is missing or the node failed, highlighted with a progress strip while it runs, and green when it has finished. After a run, Latest output on an image node shows its result.
Where results go
Section titled “Where results go”Only nodes whose Save to Gallery box is checked, at the bottom of nodes that produce images, send their images to the Gallery. The images of other nodes are intermediate results that are used and then discarded. New nodes start with Save to Gallery turned off, so check it on the node that makes your final image.
An image node’s Board field chooses where its saved images go. Auto, the default, uses the Gallery’s destination: the selected board, or the auto-add board if one is set (see Choosing where new media goes). None saves to Uncategorized, and you can also pick a specific board. Images from nodes that have no Board field go to Uncategorized.
Beside it, Use Cache lets InvokeAI reuse a node’s previous result when its inputs have not changed, which speeds up repeated runs. On a multi-user installation, only administrators see this option.
Your workflows
Section titled “Your workflows”Each project keeps its own workflows, and one of them is active: the one shown in the editor and run by Invoke. Changes are saved with the project automatically. Click the workflow’s name to open the Workflows library:
- This project — the project’s workflows. Open one to make it active, or start a New workflow.
- Browse — the workflows that ship with InvokeAI, such as Text to Image - SDXL, Flux Text to Image and the video workflows. Opening one adds a copy to your project.
- Yours — workflows you have saved to your library with Save to library…, for use in other projects.
Opening a library workflow adds an independent copy to the project; the library’s version is untouched. If the project already has a copy, opening the template asks what to do: Open copy switches to the existing copy, Add new copy makes another one, and Replace copy replaces the copy’s graph with the library version while keeping its name. A replace can be undone in one step.
Changes to a project’s workflows never change the library by themselves. Save to library…, in the editor’s header, saves the workflow as a new library template with the name you give it, including its form and its current settings as defaults. For a workflow opened from one of your own templates, Update library template replaces that template instead. If the template has changed since you opened it, you can save as a new template instead, or review the current one and replace it deliberately. Replacing a template also affects workflows that use it through the Call Saved Workflow node.
Add comma-separated tags, such as portrait, SDXL, upscaling, in the workflow’s Details; they become filters in the library. Each workflow also keeps its own undo history while the project is open.
To share a workflow, use Export workflow JSON from the ⋯ menu; others can load it with Import workflow JSON…. An image made by a workflow also carries the workflow in its metadata: right-click the image and choose Load Workflow. Download workflow as PNG in the editor toolbar saves a picture of the whole graph, at up to twice screen resolution, for documentation or sharing. Closing the workflow editor while the picture is being prepared cancels the export.
Common node patterns
Section titled “Common node patterns”A few groups of nodes appear in almost every image workflow. Knowing what they do makes it easier to read the bundled workflows and to build your own.
- Model, prompts and denoising. A model loader, such as Main Model - SDXL, provides the model’s parts: the UNet or transformer that denoises, the text encoders (CLIP) and the VAE. Prompt nodes turn text into conditioning using the text encoders. The denoise node needs both positive and negative conditioning, even if the negative prompt is empty.
- Noise and seeds. Text-to-image starts from random noise, made by Create Latent Noise from a Seed, Width and Height. Its Noise Type must match the model family: SD for SD 1.5 and SDXL, or the matching family for FLUX, FLUX.2, SD3, CogView4, Z-Image or Anima. Type a seed for repeatable results, or connect a Random Integer node to the seed for a new one on every run.
- Images and latents. Models work on compressed latents, not pixels. Image to Latents encodes an image with a VAE, for image-to-image; Latents to Image decodes the result back into pixels.
- Scaling. Scale Image and Resize Image resize pixels, Scale Latents and Resize Latents resize latents, and Image-to-Image runs an upscaling model. Latents are already compressed, so enlarging the image and then refining it often gives more detail than enlarging the latents.
- Control and LoRAs. A ControlNet node turns a control image, usually prepared by a processing node such as Canny Edge Detection or Depth Anything Depth Estimation, into a control input for the denoise node. Apply LoRA nodes (one per model family, such as Apply LoRA - SDXL) add a LoRA to the model’s UNet and text encoders.
- Iteration and batches. Iterate runs the rest of the graph once for each item in a collection, and Collect gathers several values into a collection. For example, Random Range makes a list of seeds and Iterate feeds them one at a time to the noise node, generating one image per seed. For more complex repetition, see Loop Nodes.
Adding community nodes
Section titled “Adding community nodes”The community has written many more nodes, from image effects to prompt tools. The easiest way to install a node pack is the Custom Node Manager: paste the pack’s Git URL and it is downloaded and loaded without restarting. To install one by hand, clone or download it into the nodes folder of your InvokeAI root, then click Reload in the Custom Node Manager or restart InvokeAI. git clone is the better choice, because git pull then updates the pack. The Community Nodes page lists available packs.
Keyboard shortcuts
Section titled “Keyboard shortcuts”These work while the workflow editor has focus. On macOS, use Cmd in place of Ctrl.
| Shortcut | Action |
|---|---|
| Shift+A or Space | Add a node |
| Ctrl+C / Ctrl+V | Copy / paste nodes, with the connections between them |
| Ctrl+D | Duplicate the selected nodes |
| Ctrl+A | Select all nodes |
| Delete / Backspace | Delete the selected nodes |
| Ctrl+Z / Ctrl+Shift+Z, Ctrl+Y | Undo / redo |
| Shift-drag | Box-select nodes |
| Hold Ctrl while dragging | Snap to the grid |
| Ctrl+Enter | Invoke |