
Gallery Reference
This page describes the Gallery’s menus, settings and shortcuts in detail. For an introduction to boards, searching, starring, uploading, and moving and deleting media, see Organizing your media.
Managing boards
Section titled “Managing boards”The board menu
Section titled “The board menu”Hover over a board and click its ⋮ button, or right-click it, to open its menu:
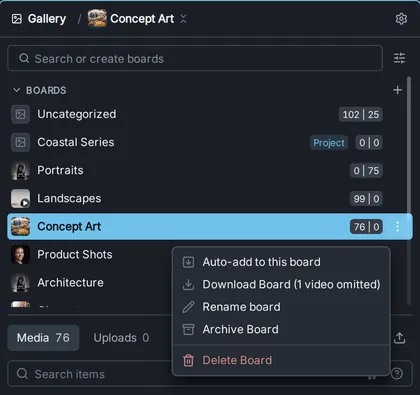
- Auto-add to this board — makes this the board that receives new results, marked Auto, whichever board is selected. On the auto-add board, the item is Stop auto-adding here, which goes back to sending results to the selected board. Not offered for date boards or archived boards. See Choosing where new media goes.
- Download Board — downloads the board (see below).
- Rename board — opens a dialog to change the name.
- Archive Board / Unarchive Board — see below.
- Delete Board — see below.
Project boards are managed through their project: their menu has Export project (.invk), Auto-add to this board and Download Board instead, and renaming the project renames its board. Uncategorized offers only Auto-add to this board and Download Board, and date boards have no menu. If the auto-add board is deleted, results go back to following the selected board.
Archiving a board
Section titled “Archiving a board”Archiving hides a board you no longer use without deleting anything. Choose Archive Board from its menu, and the board disappears from the list. To see archived boards again, turn on Archived boards in the Filter & sort boards menu; they appear in their own Archived group, where Unarchive Board returns them to the list.
Archived boards are not included in semantic search.
Downloading a board
Section titled “Downloading a board”Download Board packages the board’s images, from both its Media and Uploads tabs, into a .zip file. A notice appears while the archive is prepared, and the browser saves the file when it is ready. Videos are not included, and the menu item says how many will be left out, for example Download Board (1 video omitted). To save a video, download it on its own from its menu.
Deleting a board
Section titled “Deleting a board”Choose Delete Board from the board’s menu. The confirmation dialog shows how many images, videos and uploads the board holds, and offers two choices:
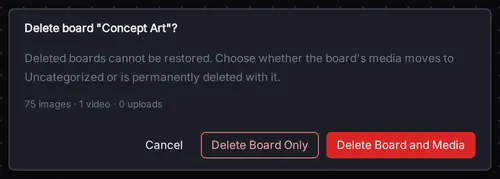
- Delete Board Only — removes the board and moves everything on it to Uncategorized.
- Delete Board and Media — removes the board and permanently deletes its images and videos.
Queued or running jobs that were sending results to the deleted board send them to Uncategorized instead. Project boards cannot be deleted from the Gallery; delete the project instead.
On a multi-user installation, only a board’s owner or an administrator can delete it. When an owner deletes a shared board with its media, only their own media is deleted and other people’s items move to Uncategorized; an administrator’s deletion removes everything. If some files cannot be removed, those items are kept in Uncategorized and a warning says how many.
The media menu
Section titled “The media menu”Right-click an item, or several selected items, for its menu.
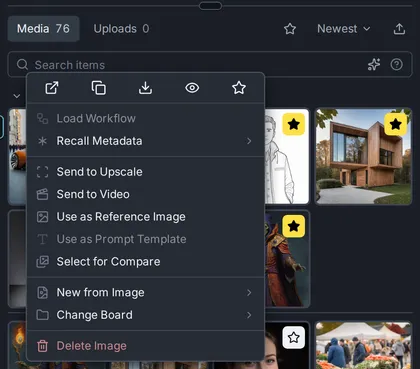
For an image, the menu offers:
- Quick actions (the icons at the top) — open in a new tab, copy to the clipboard, download, open in the Preview, and star.
- Load Workflow and Recall Metadata — restore the workflow or the settings that made the image. Recall Metadata includes Recall All, Remix Image, Use Prompt, Use Seed, Use Size and Use CLIP Skip; see Resetting to defaults. These are unavailable for images without generation metadata.
- Send to Upscale, Send to Video, Use as Reference Image, Use as Prompt Template and Select for Compare — use the image elsewhere in InvokeAI.
- New from Image — start a new canvas from the image, or add it to the current canvas as a new layer.
- Change Board and Delete Image.
A video’s menu has the equivalent actions for video, including Extend in Video, Use as Reference Video and Use as Conditioning Clip. With several items selected, the menu offers the actions that apply to all of them, such as Star All, Download Selection, Change Board and Delete Selection.
Every image generated by InvokeAI also stores its generation metadata inside the file, so the prompt and settings travel with it when you download it.
Gallery settings
Section titled “Gallery settings”The gear button in the Gallery header opens its settings:
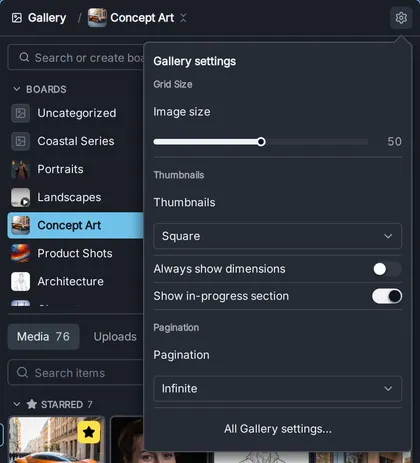
- Image size — the size of the thumbnails.
- Thumbnails — Square crops thumbnails to squares; Aspect shows each item’s full shape.
- Always show dimensions — shows each item’s width and height on its thumbnail, not only on hover.
- Show in-progress section — shows generations that are still running at the top of the grid.
- Pagination — Infinite scrolling or numbered Pages.
All Gallery settings… at the bottom opens the full settings. They also include Send new results to the selected board (under Destination), which is on by default; turn it off to keep sending results to the current destination board, which then becomes the Auto board. The full settings also include the sort order and the board visibility and sorting options from the Filter & sort boards menu. All Gallery settings are saved with the project.
Keyboard shortcuts
Section titled “Keyboard shortcuts”These work while the Gallery has focus:
| Shortcut | Action |
|---|---|
| Arrow keys | Move through the grid |
| Shift-click / Ctrl-click | Select a range / add or remove an item |
| Ctrl+A | Select everything loaded on the page |
| Escape | Clear the selection |
| . (period) | Star or unstar the selection |
| Delete / Backspace | Delete the selection |
| R | Remix the selected image: recall its settings, except the seed |
On macOS, use Cmd in place of Ctrl. See Hotkeys for all shortcuts.