
Generating and modifying still images
The Generate panel is where you create still images from a text prompt. This page gets you started: choosing a model, writing a prompt and generating a first image, and choosing whether results go to the Gallery or the Canvas. The Generate Panel Reference then describes every section of the panel in detail.
The Generate panel sits in the left rail of the Compose layout (Alt+1), where finished images appear in the Preview in the center of the screen. It is also in the Edit layout (Alt+2), next to the Canvas. Press 1 to bring it to the front, or Alt+A to jump straight to its prompt. See The Workbench for how layouts and panels work.
The panel is divided into sections: the model picker and prompts at the top, followed by Size, Guidance, Render, Components and Advanced. Which sections and fields you see depends on the selected model, and each section header shows a summary of its settings, so you can keep sections you rarely change collapsed.
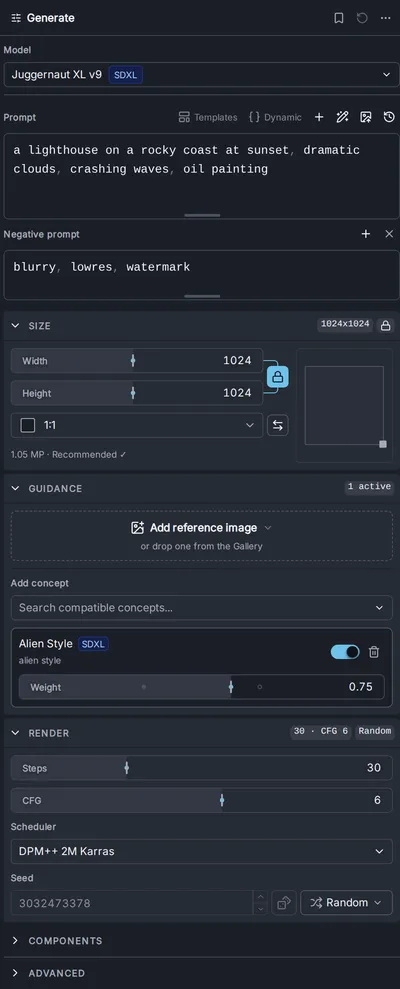
Selecting a model
Section titled “Selecting a model”The Model picker at the top of the panel lists the image generation models you have installed, grouped by model family. Type in Search models… to find one by name, family or description, or use the family chips to narrow the list. If the list is empty, install a model first; see Managing media generation models.
When you switch models, the panel keeps your prompt and settings and adjusts only what the new model cannot use: it snaps the size to the new model’s grid, and turns off or removes concepts, reference images and options the model does not support. If anything would be lost, a Switch model? dialog lists it before you confirm. Switching does not load the new model’s recommended settings; use Reset all to model defaults for that.
Model components
Section titled “Model components”Many newer models are installed as a single file that holds only the main network, and need companion models, such as a text encoder and a VAE, to generate. For these models the panel shows a Components section with a slot for each companion model. A Diffusers install of the same model carries its own components and leaves the slots on Model default. Submodels explains what each component does, and each model family’s page under Local Models lists the ones it needs.
If a required component is missing, Invoke is disabled and its tooltip names the slot to fill, for example “Generate needs a VAE for FLUX models.” Pick an installed model in the slot, or install the family’s starter bundle from the Model Manager, which includes everything the family needs.
Your first image
Section titled “Your first image”-
Write a prompt. Type a description of the image into the Prompt box, for example a lighthouse on a rocky coast at sunset, dramatic clouds, oil painting. Describe the subject, the setting, the lighting and the style you want. The Prompting Guide has advice on writing prompts that work.
-
Choose how many images. The Iterations field in the top bar, next to Invoke, sets how many images one press of Invoke produces. Seed explains how their seeds are chosen.
-
Press Invoke in the top bar, or press Ctrl+Enter (Cmd+Enter on macOS). The job joins the queue, and the top bar shows its progress. The first run with a model takes longer while the model loads.
-
See the result. The finished image appears in the Preview and is saved to the Gallery. To stop a run, click the cancel button in the queue area of the top bar, or press Shift+X.
Hover over Invoke to see what will be queued, for example 1 prompt × 4 iterations → 4 generations. When Invoke is disabled, the same tooltip lists what is stopping it.
Routing images to the Gallery or the Canvas
Section titled “Routing images to the Gallery or the Canvas”Every press of Invoke has a route: a source, the panel whose settings are used, and a destination, where the results go. Images can go to one of two destinations:
- Gallery — the image is saved to the Gallery, on the board selected there, and shown in the Preview.
- Canvas — the image lands in the Canvas’s staging area, where you can compare the results and accept one onto the canvas as a new layer.
Each layout preset starts with the route that suits its purpose. The Compose preset routes the Generate panel to the Gallery. The Edit preset routes to the Canvas, using the Canvas’s layers and bounding box as the source, so results come back to the canvas for further editing. Switching presets switches to the new preset’s route, unless the routing is locked.
The routing control next to Invoke in the top bar shows the current source and destination as a pair of icons. Click it to change either one:
- Source lists the panels in the current layout that can run a generation, such as Generate, Canvas, Upscale and Video.
- Destination chooses Gallery or Canvas.
- Lock routing keeps the route fixed. A small dot on the control shows that it is locked.
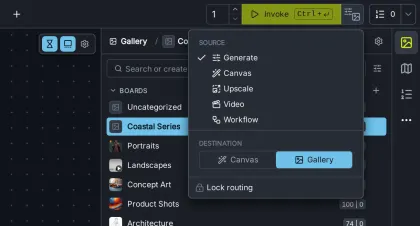
The route also follows your work. When you change a setting in a different panel, that panel becomes the source, and the destination changes to match: the Canvas sends results to the Canvas, and the other panels send them to the Gallery. For example, editing the prompt in the Generate panel while you are in the Edit layout sends the next results to the Gallery. Lock the routing if you want results to keep going to one place while you work in several panels. To send a single run to the other destination without changing the route, press Alt+Ctrl+Enter (Alt+Cmd+Enter on macOS).
The route is saved with the project, so each project remembers where its results go. See Projects for everything a project keeps.
Going further
Section titled “Going further”The Generate Panel Reference describes the rest of the panel in detail:
- Image size — width, height, aspect ratio and the model’s optimal size.
- Render settings — steps, CFG or guidance, scheduler, seed, the negative prompt, advanced options, and Reset all to model defaults.
- Concepts — add LoRAs that teach the model a style, character or object.
- Reference images — guide the image by example instead of by words.
- Prompt tools — expand a prompt, write one from an image, and reuse earlier prompts.
The Prompting Guide covers writing prompts that work, prompt templates and dynamic prompts.