
Crafting images with the Canvas
The Canvas is where you build and refine an image in layers. You can paint, repaint part of an image (inpainting), extend it beyond its edges (outpainting), guide different regions with their own prompts, and steer the composition with control images, generating as many times as you like and keeping only the results you want.
The Canvas lives in the Edit layout (Alt+2): the Canvas is in the center, the Generate panel on the left supplies the model, prompt and settings, and the Layers panel on the right lists the canvas’s layers and their settings.
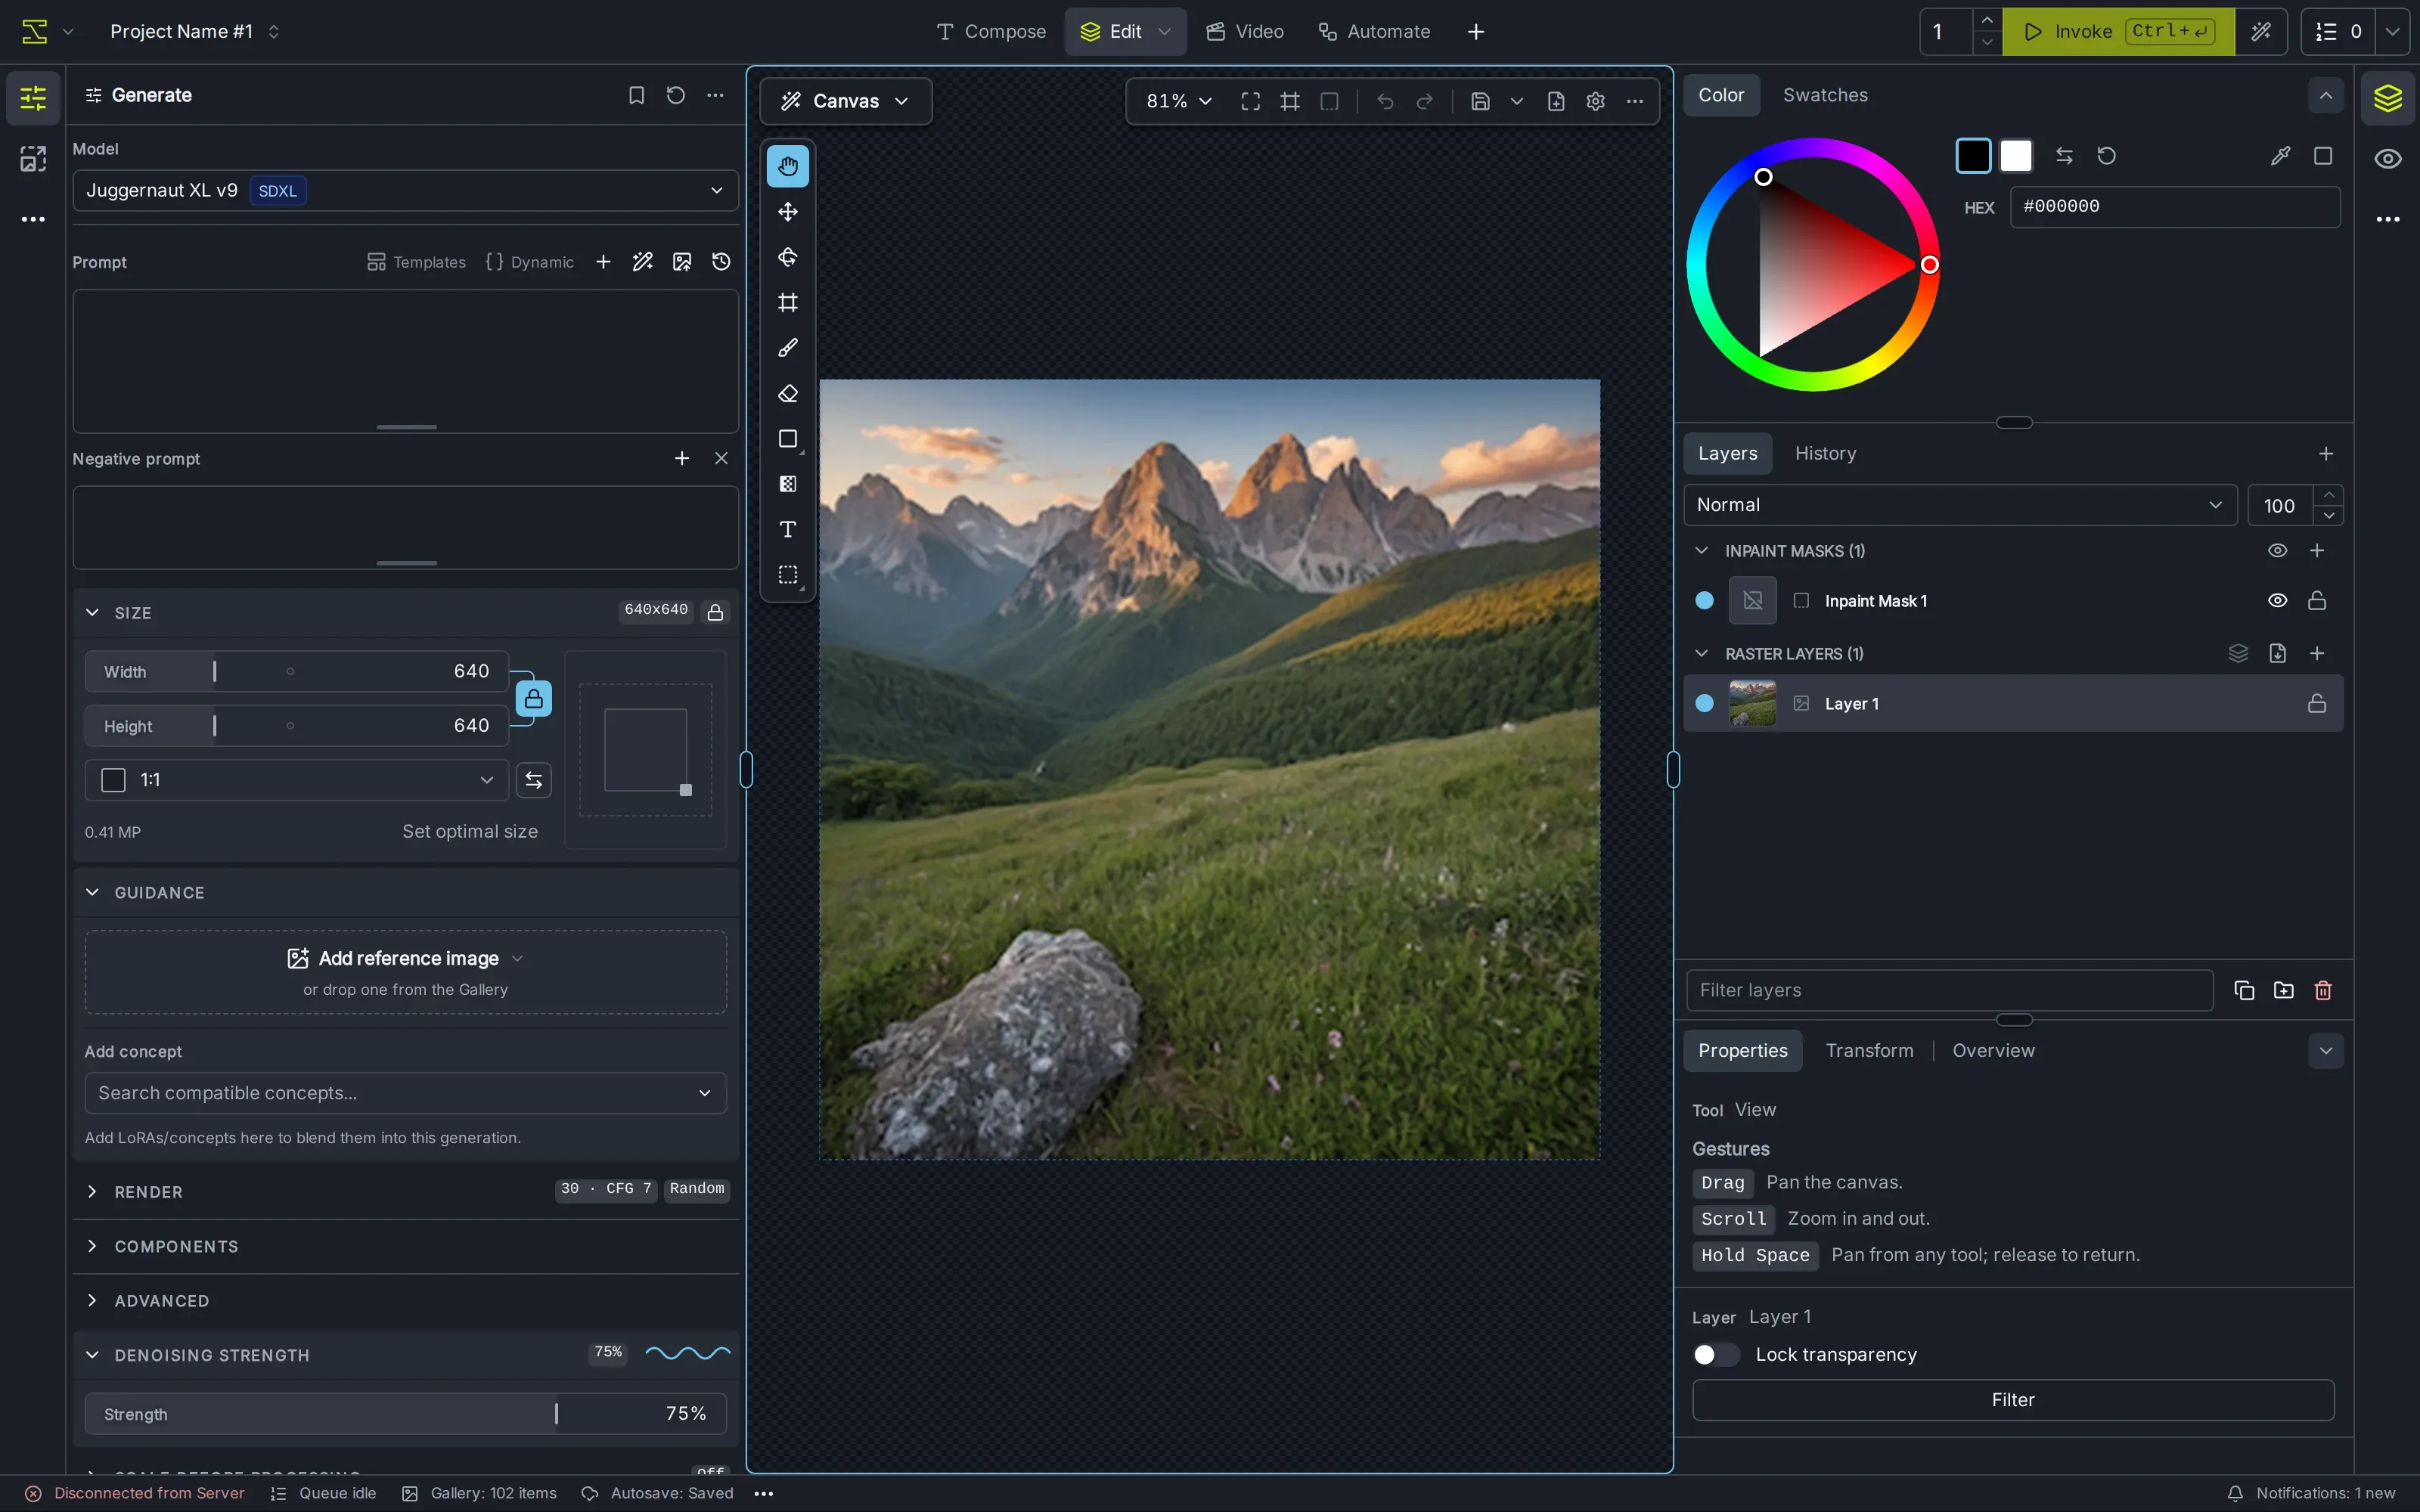
This page introduces the main ideas and tasks. The Canvas guide and the Layers panel guide describe every tool, menu and setting.
Canvas concepts
Section titled “Canvas concepts”Layers
Section titled “Layers”A canvas is a stack of layers. Each layer has a type, which decides what it contributes to a generation:
| Layer type | What it is for |
|---|---|
| Raster layer | Ordinary image content: pictures, painting, shapes, gradients and text. The visible raster content inside the generation frame is the starting image for a generation. |
| Inpaint mask | Marks the area to regenerate. Everything outside the mask is kept. |
| Regional guidance | Marks an area that gets its own prompt, and optionally its own reference image, so different parts of the image can be described differently. |
| Control layer | Holds a guide image, such as edges, a depth map or a pose, that a control model uses to shape the composition. |
The Layers panel groups layers by type, in the stacks Inpaint Masks, Regional Guidance, Control Layers and Raster Layers. Within a stack, higher layers are drawn over lower ones. Add a layer with the + button above the layer list:
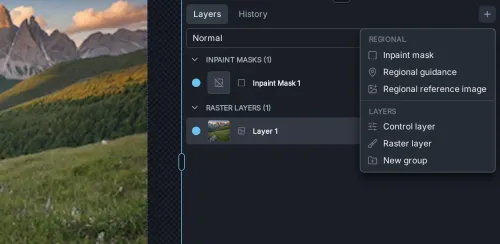
Each layer row has a dot on the left that switches the layer on or off for generation. Masks, regional guidance and control layers also have an eye button, which only hides them from view: a hidden mask still affects generation. Shift+H hides all of them at once so you can see the image underneath.
Settings live in the Properties pane
Section titled “Settings live in the Properties pane”Each layer’s settings, such as a regional prompt or a control layer’s model, are in the Properties tab at the bottom of the Layers panel. Select the layer and click Properties: the heading at the top of the tab confirms which layer you are editing, for example Layer: Regional Guidance 1. The settings are in its Layer section. The Layer section comes after the settings of the active tool, so you may need to scroll the Properties pane down to see it. Dragging the divider above the Properties pane upward, or collapsing the color picker, gives it more room.
The generation frame
Section titled “The generation frame”The dashed rectangle on the canvas is the generation frame, also called the bounding box. Only the area inside it is generated: what lies inside is the model’s starting point, and the result is placed back in the same spot. The frame’s size is the generation size, and it stays in step with the Size section of the Generate panel. Move and resize it with the Generation frame tool (press C). See The generation frame for details.
What Invoke does
Section titled “What Invoke does”When the Canvas is the source of a generation, InvokeAI looks at what is inside the generation frame and chooses the kind of generation for you:
| Inside the frame | Generation |
|---|---|
| No visible raster content | Text to image: a new image from the prompt alone. |
| Raster content covering the whole frame, no inpaint mask | Image to image: the content is repainted. Denoising strength in the Generate panel sets how much it changes. |
| Raster content covering the frame, and an inpaint mask | Inpainting: only the masked area is regenerated. |
| Raster content that covers only part of the frame | Outpainting: the empty part is filled in, blending into the existing content. |
Sending generations to the Canvas
Section titled “Sending generations to the Canvas”In the Edit layout, Invoke uses the Canvas as its source and sends the results back to the Canvas. The routing control next to Invoke shows this. Editing the canvas switches the route back to the Canvas automatically, unless the routing is locked. See Routing images to the Gallery or the Canvas.
When the source is the Canvas, the Generate panel adds three sections at the bottom:
- Denoising strength — how much image-to-image, inpainting and outpainting may change the existing content. The default is 75%.
- Scale before processing — generate at a different size, for example the model’s optimal size, and scale the result back to the frame.
- Compositing — how inpainted and outpainted areas are filled and blended: Infill method, Coherence pass mode, Coherence edge size, Coherence min denoise and Mask blur.
Results do not go straight onto the canvas. They appear in the staging area, a bar at the bottom of the canvas where you can step through the candidates, then Accept to Layer the one you want (it becomes a new raster layer), Save to gallery, or Discard. While results are staged, the canvas tools are locked except for View.
Inpainting
Section titled “Inpainting”Inpainting regenerates part of an image and leaves the rest untouched: remove an object, fix a face, or change what is in a corner.
-
Add an inpaint mask, or select the one a new canvas starts with, in the Inpaint Masks stack.
-
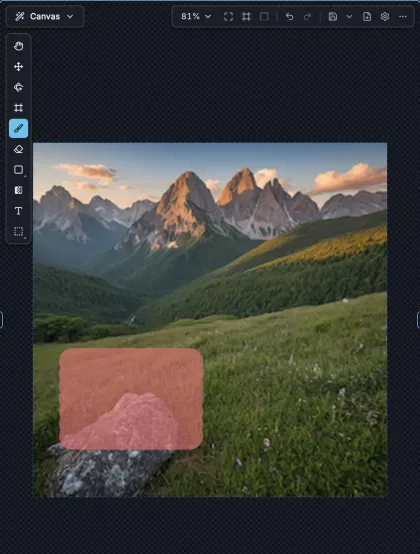
Paint the mask. Choose the Brush (B) and paint over the area to regenerate, or draw it with the Shape tool (R). The mask shows as a tinted overlay. The Eraser (E) removes mask, and [ and ] change the brush size.
-
Describe the result in the Generate panel’s prompt: describe the whole picture as it should look, or just what should appear in the masked area.
-
Press Invoke, then pick a result in the staging area and click Accept to Layer.
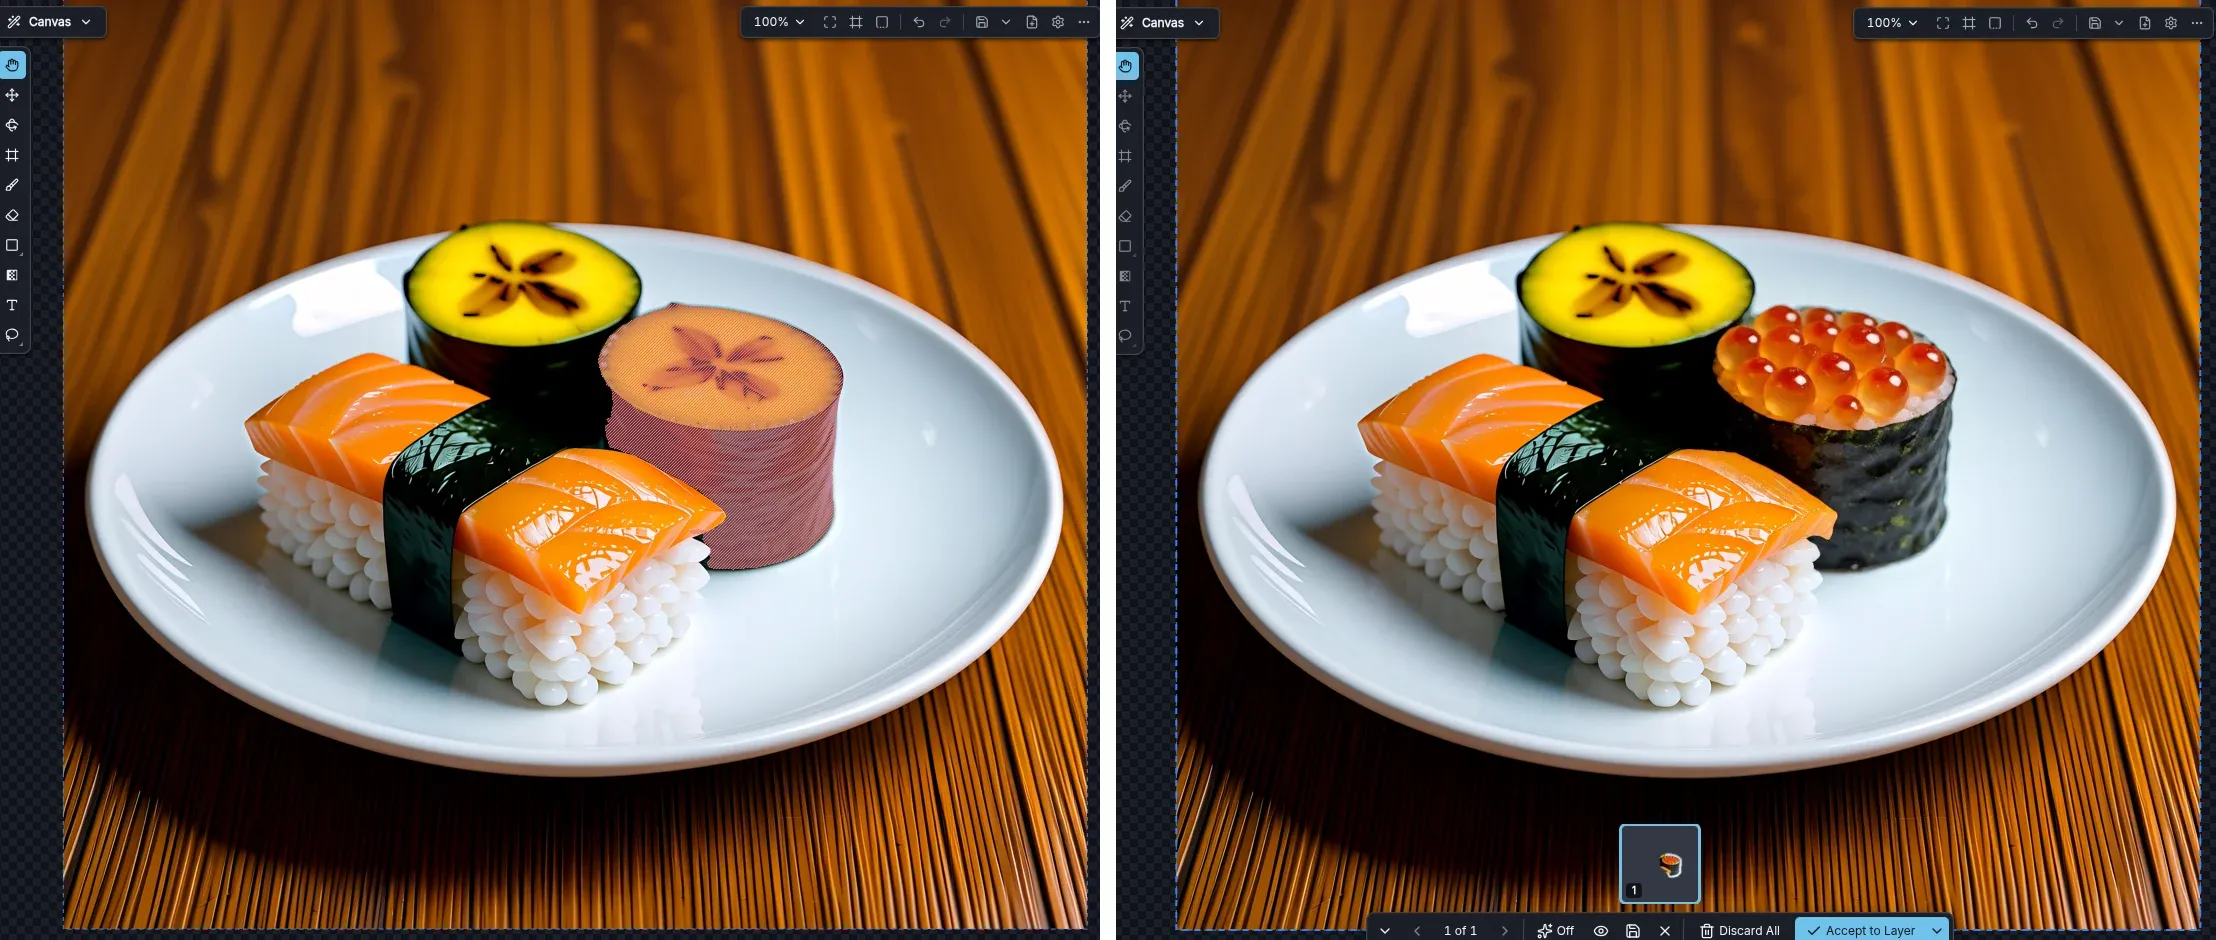
Denoising strength controls how much the masked area may change: lower values keep its colors and shapes, higher values replace it. Two optional modifiers, added from the mask’s right-click menu, give finer control: Add noise adds noise inside the mask before generating, and Add denoise limit caps how strongly it can be repainted. The mask’s Invert mask button, in its Properties, swaps the masked and unmasked areas.
Outpainting
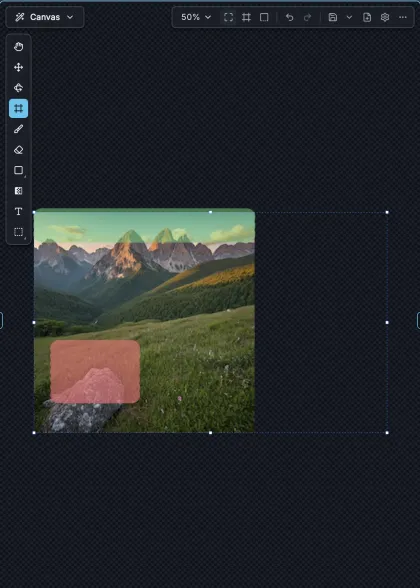
Section titled “Outpainting”Outpainting extends an image beyond its edges.
-
Choose the Generation frame tool (press C).
-
Extend the frame past the edge of the image by dragging its handles, or type a new width and height in the Frame section of the Properties pane. Part of the frame now covers empty canvas.
-
Press Invoke. The empty area is filled first, using the Infill method in the Generate panel’s Compositing section, and then generated so that it blends into the existing image.
Include some of the existing image in the frame, since the model uses it to continue the scene. You can combine outpainting with an inpaint mask to regenerate part of the existing image at the same time.
Regional prompts and reference images
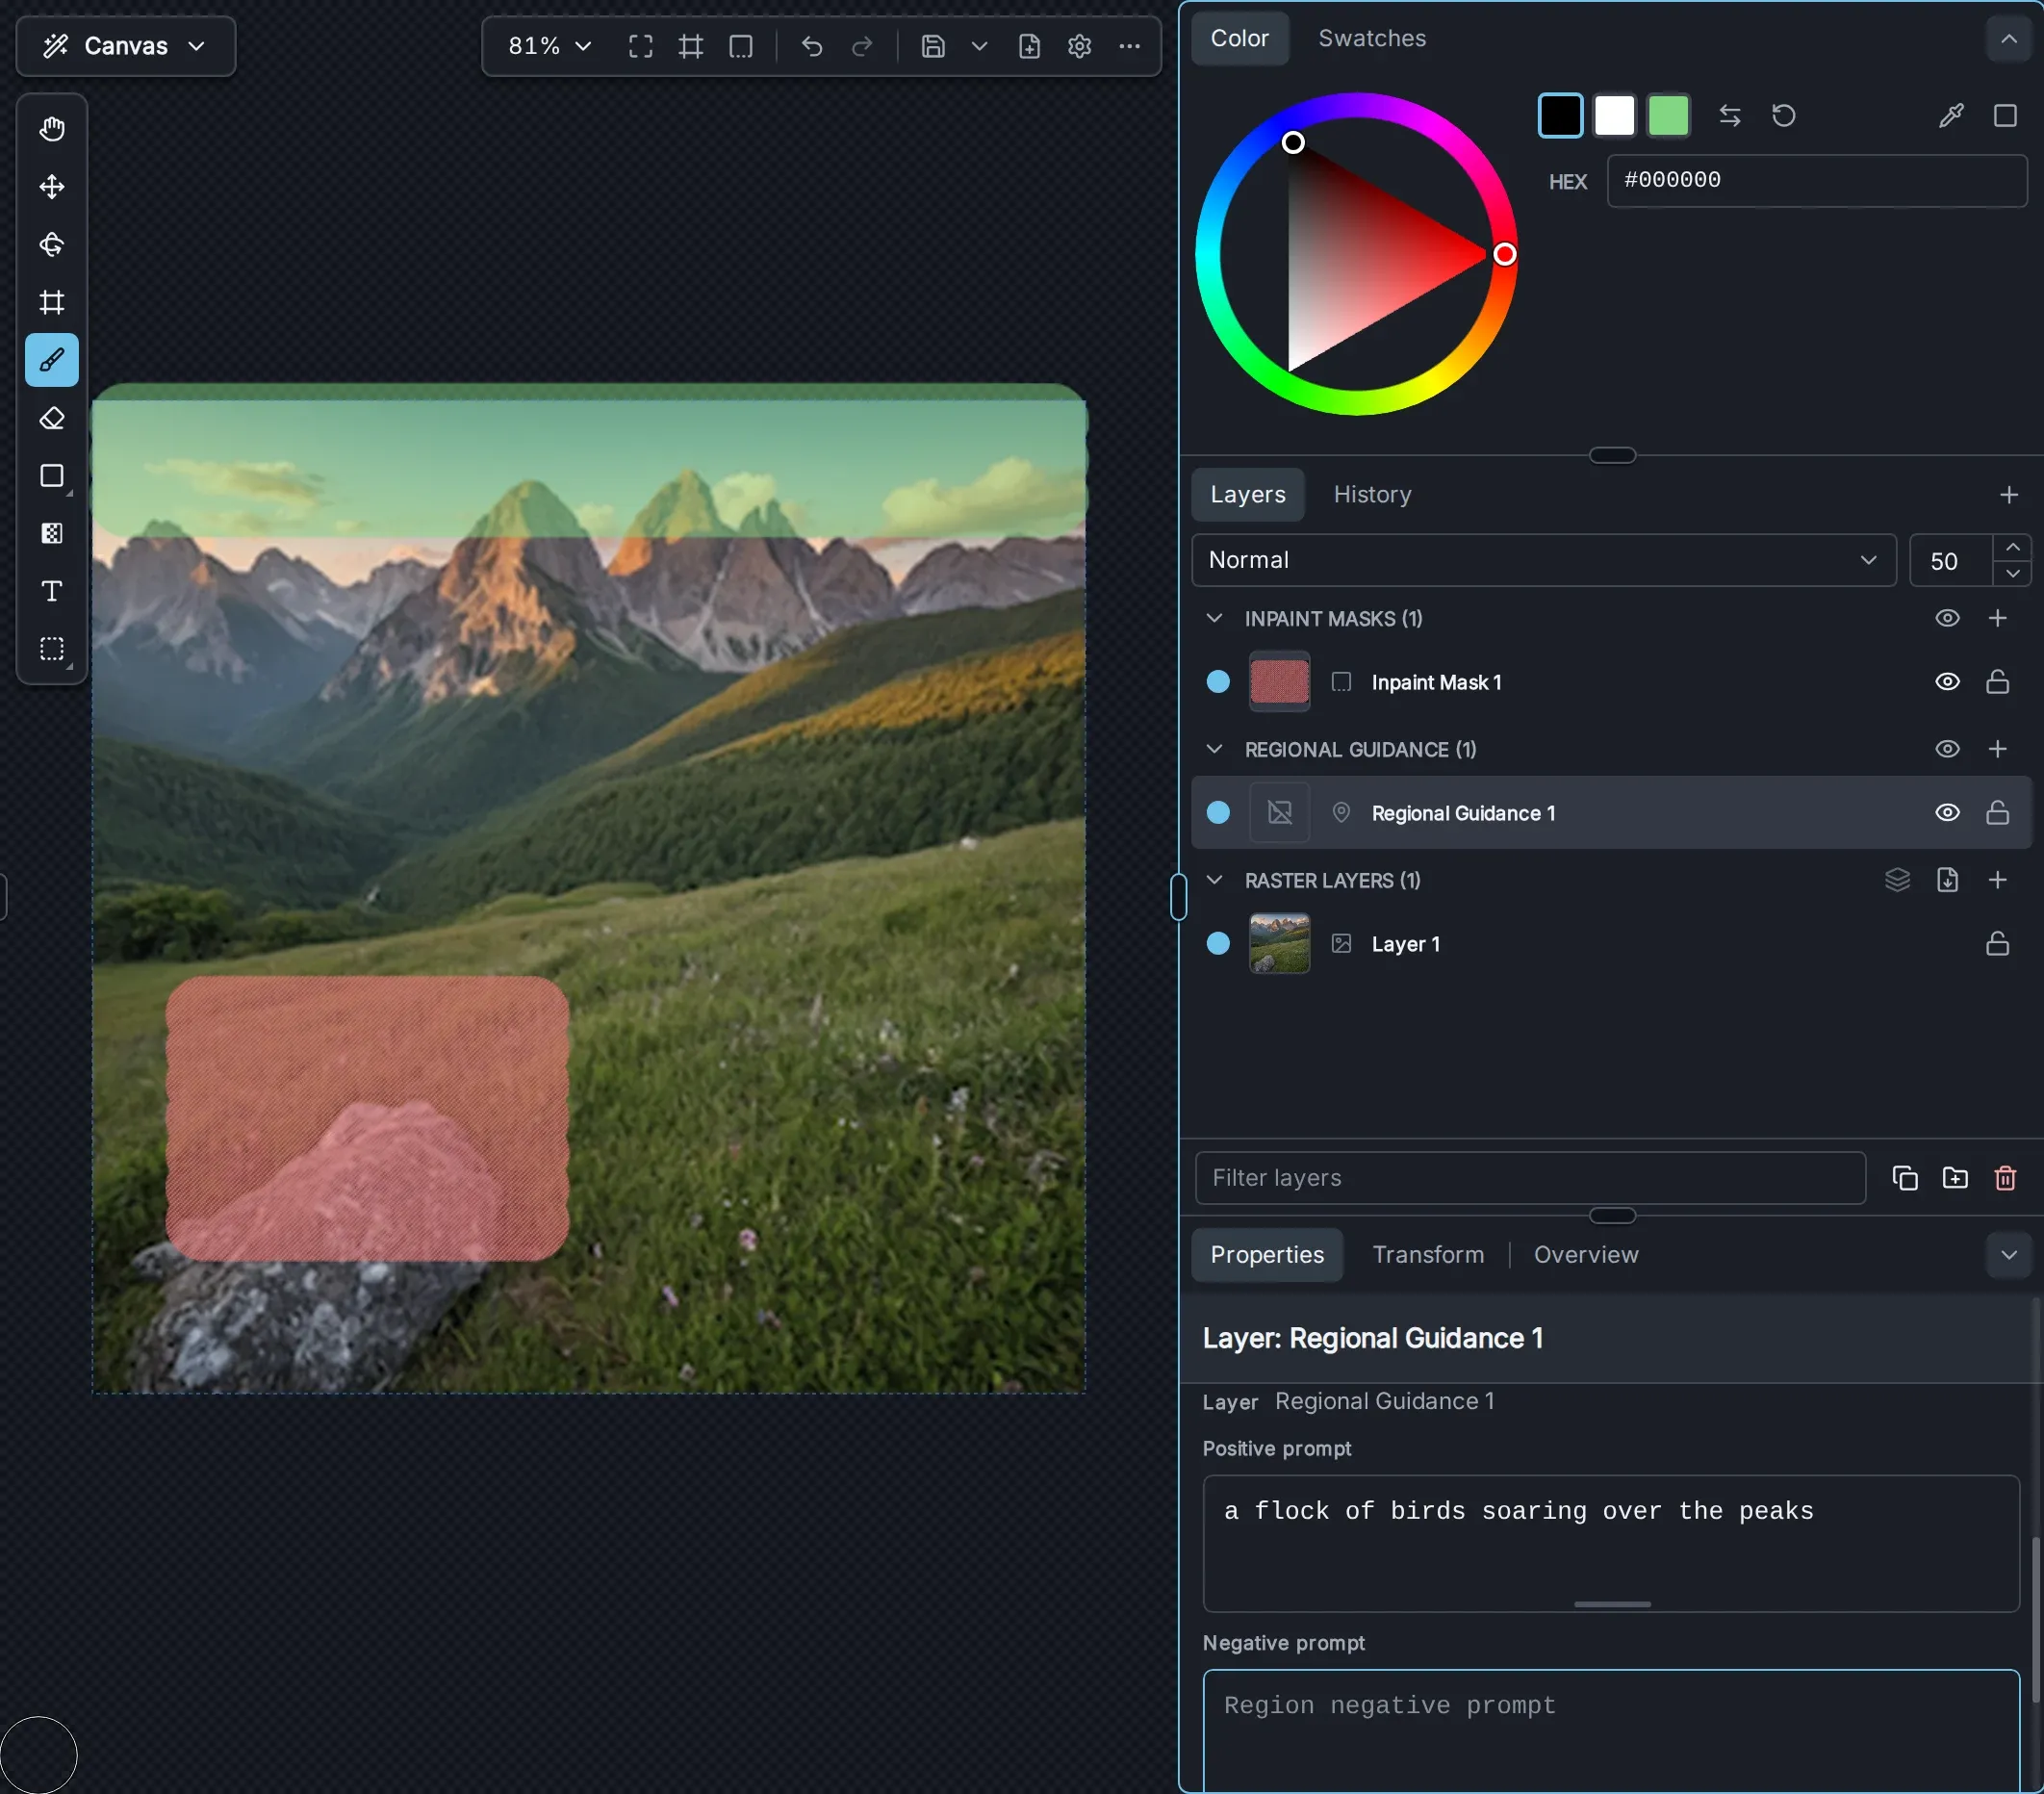
Section titled “Regional prompts and reference images”Regional guidance gives one area of the image its own prompt. For example, keep the main prompt for the landscape and add birds only in the sky.
-
Add a Regional guidance layer with + → Regional guidance.
-
Paint the region with the Brush, or draw it with the Shape tool. It shows as a tinted overlay.
-
Enter the region’s prompt. With the layer selected, open Properties and scroll down to its Layer section. Type in Positive prompt, and optionally Negative prompt. The prompt is saved when you click away from the field.
-
Press Invoke. The main prompt still describes the whole image; the regional prompt applies inside the region.
To guide a region with an image instead of, or as well as, words, choose Add reference image from the regional guidance layer’s right-click menu, or add a Regional reference image layer from the + menu. The reference appears as a row under the layer; select that row to choose its image, model and weight in Properties.
Regional guidance works with SD 1.5, SDXL, FLUX.1, FLUX.2, Krea-2, Z-Image and Anima. Regional negative prompts are available for SD 1.5 and SDXL, and regional reference images for SD 1.5, SDXL (IP-Adapter) and FLUX.1 (FLUX Redux). With other models, regional layers are skipped, and the layer’s Properties say so. For a reference image that applies to the whole picture, use Add reference image in the Generate panel instead.
Control layers
Section titled “Control layers”A control layer shapes the composition with a guide image: the edges of a sketch, the depth of a scene, or a person’s pose. A control model makes the generated image follow it.
-
Put the guide image on a control layer. A control layer’s image is its own pixels; there is no separate image picker. Do one of these:
- Right-click a raster layer and choose Copy to → Copy to control layer, or Convert to → Convert to control layer.
- Drag an image from the Gallery onto the canvas and drop it on Add as Control Layer (see below).
- Add an empty Control layer from the + menu and draw on it.
-
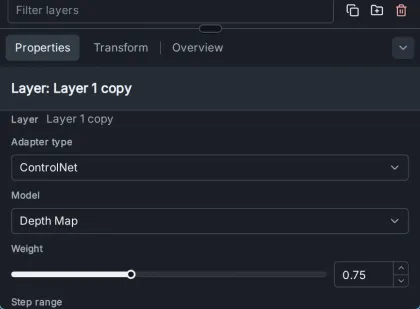
Choose the model. Select the layer, open Properties and scroll to its Layer section. Choose the Adapter type (ControlNet, T2I Adapter, Control LoRA or Z-Image ControlNet) and the Model. A compatible installed model is chosen for you when the layer is created.
-
Process the image, if needed. Most control models expect a processed image, such as an edge map or a depth map, rather than a photograph. Choosing a model starts its recommended Filter automatically; you can also click Filter, pick a filter, and Apply it.
-
Adjust the influence with Weight (how strongly the guide is followed), Step range (which part of the generation it applies to) and, for ControlNet, Control mode. Then press Invoke.
Control layers work with SD 1.5, SDXL, FLUX.1 and Z-Image, and need a control model for the same family, installed from the Model Manager’s starter models. If the Model list is empty, no compatible model is installed for the model selected in the Generate panel. A control layer without a model stops Invoke with the message Select a control model before generating.
Drawing on a raster layer
Section titled “Drawing on a raster layer”You can paint directly on the canvas, for example to sketch a composition for image-to-image, or to touch up a result.
- Select a raster layer in the Layers panel, or add one with + → Raster layer. If you start painting with no suitable layer selected, a new raster layer is created for you.
- Pick a color in the color picker at the top of the Layers panel. Its two chips are the foreground color, used by the brush, and the background color. X swaps them and D resets them to black and white. Hold Alt to pick a color from the canvas.
- Choose the Brush (B) and paint. Its Size, Opacity and Hardness are in the Properties pane; [ and ] change the size. The Eraser (E) erases.
The tool strip also has shape, gradient and text tools, which are described in the Canvas guide.
Adding a gallery image to a layer
Section titled “Adding a gallery image to a layer”There are three ways to bring an existing image onto the canvas:
- Drag it from the Gallery. With the Gallery and the Canvas both on screen (for example, the Compose layout with its center view switched to Canvas), drag an image onto the canvas. Drop zones appear: Add as Raster Layer, Add as Control Layer, Add as Regional Reference Image, Add as Inpaint Mask and Add as Resized Control Layer, which scales the image to the model’s optimal size.
- Use the image’s menu. Right-click an image in the Gallery or Preview and choose New from Image → New Layer from Image, then the kind of layer. New from Image → New Canvas from Image instead starts a new project whose canvas holds the image, sized to fit it.
- Paste it. Copy an image, click the canvas and press Ctrl+V (Cmd+V on macOS). It is added as a new raster layer at the generation frame.
A new raster layer from an image is placed at its full size at the top-left of the generation frame. Use the Move (V) or Transform (Ctrl+T) tool to position and scale it.