
Canvas guide
This page describes the Canvas itself: its tools, controls and menus. For an introduction to working with the Canvas, see Crafting images with the Canvas. The Layers panel, where layers and their settings are managed, has its own guide.
Each project has one canvas. It opens in the center of the Edit layout (Alt+2), or press 2 to bring it to the front.
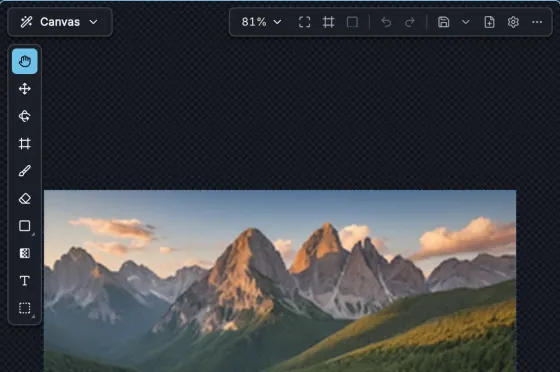
The tool strip on the left edge of the canvas holds the drawing and editing tools. A tool’s options appear in the Tool section of the Properties tab in the Layers panel, not on the canvas.
| Tool | Key | What it does |
|---|---|---|
| View | H | Pan by dragging. Hold Space to pan from any tool. |
| Move | V | Move the selected layers. Shift locks the direction. Dragging inside a selection lifts the selected pixels so you can move them; Enter places them. |
| Transform | Ctrl+T | Scale and rotate the selected layer with handles. See Transforming layers. |
| Generation frame | C | Move and resize the generation frame. Tap C to switch to it, or hold C to use it briefly. |
| Brush | B | Paint on the selected raster layer, or paint a mask or region on the selected inpaint mask or regional guidance layer. |
| Eraser | E | Erase paint or mask. |
| Shape | R | Draw a rectangle, ellipse, triangle, star, polygon or freehand shape on a raster layer, or add a shaped area to the selected inpaint mask or regional guidance layer. Press R again to cycle through the shapes. |
| Gradient | G | Create a linear or radial gradient. |
| Text | T | Add editable text. |
| Marquee select / Lasso select | U / L | Select an area of pixels. Press U again to switch between rectangle and ellipse, or L again for freehand and polygon. |
The Shape and Select buttons hold several tools. Click to use the current one, or press and hold (or right-click) the button to choose another. To pick a color from the canvas, hold Alt with any painting tool and click. While you pick, a round loupe follows the pointer: it magnifies the pixels around it, boxes the pixel that will be picked in the center, and shows that pixel’s RGB values. The pointer itself is hidden, so aim with the boxed pixel. You can drag to sample as you go; the color is set when you release.
Tool options
Section titled “Tool options”- Brush — Size, Opacity and Hardness; the Foreground color; and, under Dynamics, whether pen pressure affects the width or the opacity. [ and ] make the brush smaller or larger, and so does Ctrl+scroll.
- Eraser — Size, Opacity and Hardness.
- Shape — the Kind of shape; Place on, which draws on the Selected layer or on a New layer of its own; Fill and Stroke, each with a color; and the stroke Width. Shift constrains the proportions. For polygons, click to place points and double-click, press Enter or click the first point to close the shape. With an inpaint mask or regional guidance layer selected, the shape is added to the mask or region, which makes shapes a quick way to mark rectangular or geometric areas; the colors are ignored.
- Gradient — Kind (Linear or Radial), Angle, and the color Stops, which can be added and removed or follow the foreground and background colors. Dragging creates a gradient layer the size of the generation frame, or repositions the selected gradient layer.
- Text — the font Family, Style or Weight, Size, Line height, Align and Fill color. Click the canvas to start typing; Ctrl+Enter or clicking elsewhere finishes the text, and Escape cancels it. The text stays editable as a text layer.
- Marquee select and Lasso select — the Shape and the selection Mode (Replace, Add, Subtract or Intersect). Shift adds to the selection and Alt subtracts from it. The Actions fill or erase the selection, lift it to a New layer, Invert it, select everything, or Deselect.
The Text tool offers built-in font families, plus any fonts you add. To add fonts, open Fonts in the Launchpad and use Add Fonts to upload .ttf, .otf, .woff or .woff2 files. Uploaded fonts are private to your account (My fonts); administrators can also upload shared fonts for everyone on the server. Select a font in the library to preview it and see its variation axes and named instances. Variable fonts expose those axes in the Text tool’s options.
Fonts placed in the server’s fonts directory are also available to everyone. It is fonts in the InvokeAI root folder by default and can be changed with fonts_dir in invokeai.yaml. It may contain subfolders. Refresh the app after adding or removing files there.
If a project uses a font that is not installed, a dialog lets you retry, upload the font, or choose a replacement. You can keep editing with a marked fallback, but generating or saving the affected text needs the font. When you export a project, Include font files bundles the fonts it uses, if you have the right to redistribute them.
Selections restrict painting: while an area is selected, brush strokes stay inside it. Ctrl+A selects all, Ctrl+D deselects and Ctrl+Shift+I inverts the selection.
Navigating the canvas
Section titled “Navigating the canvas”- Zoom with the mouse wheel, which zooms around the pointer, or choose a level from the zoom menu in the header (25% to 500%).
- Pan with the View tool, by holding Space, or by dragging with the middle mouse button.
- Fit to view (header) fits the generation frame and all layers into the window.
The header
Section titled “The header”The buttons along the top of the canvas, from left to right:
- Zoom level and Fit to view.
- Fit frame to layers (Shift+N) — resizes the generation frame to enclose all layers.
- Fit frame to masks (Shift+B) — resizes the generation frame to enclose the inpaint masks.
- Undo canvas edit (Ctrl+Z) and Redo canvas edit (Ctrl+Shift+Z or Ctrl+Y).
- Save Canvas to Gallery — saves the visible canvas as an image on the Gallery’s selected board. Its arrow offers Save BBox to Gallery, which saves only what is inside the generation frame.
- New session → New canvas — clears all layers and starts a fresh canvas with an empty inpaint mask. This cannot be undone.
- Canvas settings — see below.
The generation frame
Section titled “The generation frame”The generation frame is the area that is generated. With the Generation frame tool selected, drag inside the frame to move it and drag its handles to resize it. Shift keeps the proportions, Ctrl resizes from the center, and Alt turns off snapping to the model’s grid.
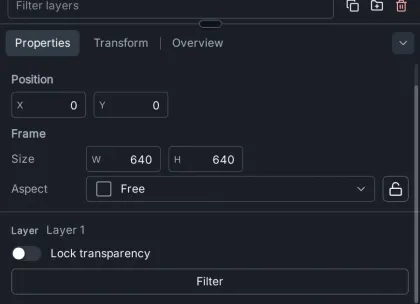
The tool’s options show the frame’s Position and Size, and an Aspect menu for common aspect ratios, with a lock. The frame’s size is the generation size, so it matches the Size section of the Generate panel, and it snaps to the sizes the selected model supports.
What the model sees
Section titled “What the model sees”When you press Invoke, the enabled raster content inside the frame is combined into the image the model starts from. Content outside the frame is not included, even though it remains visible on the canvas. Control layers and regional guidance are likewise read only inside the frame.
This makes placement important. If the model needs to continue a shape, match a texture or keep part of a subject, include enough of it inside the frame to give the model context. Moving the frame changes which part of the image the next generation can use.
The frame is not a mask: everything inside it can change in image-to-image. To regenerate only part of the area, add an inpaint mask.
Frame size and processing size
Section titled “Frame size and processing size”The frame is the final footprint of the generation on the canvas. With Scale before processing (in the Generate panel’s canvas sections) set to Auto or Manual, InvokeAI generates at a different resolution, such as the model’s optimal size, and then resizes the result to fit the frame. Choose a frame large enough to include the context the model needs, while keeping it within a size the model and your GPU memory handle well.
Transforming layers
Section titled “Transforming layers”Choose Transform from a layer’s menu, or press Ctrl+T, to scale and rotate the selected layer:
- Drag a corner or edge handle to scale. Shift scales proportionally and Alt scales from the center.
- Drag just outside a corner to rotate. Shift rotates in 15° steps.
- Drag inside to move.
Press Enter or click Apply to finish, or Escape or Cancel to undo the transform. The Transform tab of the Layers panel sets the position, scale and rotation numerically. A negative scale flips the layer.
To crop a layer to the generation frame, choose Crop layer to bbox from its menu. Fit to bbox scales a layer to fit inside the frame.
Filters and object selection
Section titled “Filters and object selection”Filter, in a layer’s menu or its Properties, processes a raster or control layer. Starting it opens the Layers panel’s Properties tab, headed Operation: Filter, where you choose and preview the filter. The filters are grouped by purpose:
- Edge detection — Canny, HED, Lineart, Lineart Anime, MLSD, PiDiNet and Scribble.
- Depth & normal — Depth Anything and Normal map.
- Pose & face — DW Openpose and Mediapipe Face.
- Color & tone — Color map and Adjust image.
- Blur & noise — Content shuffle, Blur and Noise.
- Upscale — an upscaling model.
Choose a filter and its settings in Properties, click Process (or turn on Process automatically) to preview the result, then Apply it. The arrow next to Apply offers Apply as a new raster or control layer instead. Edge, depth and pose filters produce the guide images that control layers need.
Select object, in a layer’s menu, finds an object automatically with a segmentation model. Its settings open in the Properties tab, headed Operation: Select Object. Click the object to add points (Shift-click marks areas to exclude), or describe it by text, then Process and Apply, or save the result as a selection or a new layer.
Running a workflow on a layer
Section titled “Running a workflow on a layer”Run workflow, in a raster or control layer’s menu, processes the layer with the project’s active workflow, the one open in the workflow editor. In the Run workflow from layer dialog, choose:
- Workflow image input — the workflow’s image field that receives the layer.
- Workflow image output — the node whose image is the result.
- Destination — Canvas staging, Replace layer, Copy as raster layer, or Gallery.
Then click Run. If the workflow has no image input and output it can connect, the dialog says so. The layer must be enabled, unlocked and not empty.
The staging area
Section titled “The staging area”When the Canvas is the destination, results appear in the staging area at the bottom of the canvas, not directly on it. The staging bar lets you:
- Step through the results with the arrows, or with ← and →, and show or hide the result thumbnails.
- Accept to Layer — add the current result as a new raster layer and close the staging area. The arrow next to it offers Keep as Hidden Layer, which adds the result as a disabled layer and keeps staging open.
- Save to gallery the current result, Discard it (Delete), or Discard All.
- Hide the preview of the current result to compare it with the canvas underneath.
- Auto-switch — show each new result as it arrives (Newest), follow the one in progress (In progress), or stay on the current one (Off).
- Cancel the running generation.
Right-click a result’s thumbnail to recall its settings into the Generate panel. While results are staged or a canvas generation is running, only the View tool works.
The canvas menu
Section titled “The canvas menu”Right-click the canvas to open the menu of the selected layer, the same menu as in the Layers panel (see the Layers panel guide), with two extra submenus:
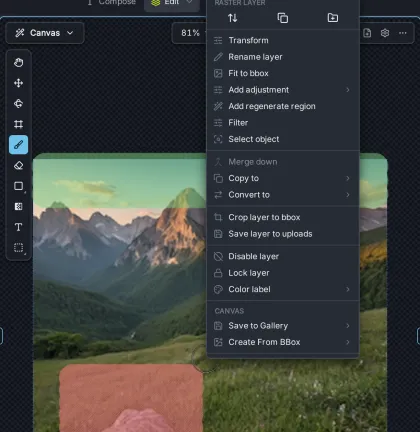
- Save to Gallery — Save Canvas to Gallery or Save BBox to Gallery.
- Create From BBox — copy what is inside the generation frame into a New Global Reference Image, New Regional Reference Image, New Control Layer or New Raster Layer.
With no layer selected, the menu has only these two submenus.
Canvas settings
Section titled “Canvas settings”The gear button in the header opens the canvas settings. They are saved with the project.
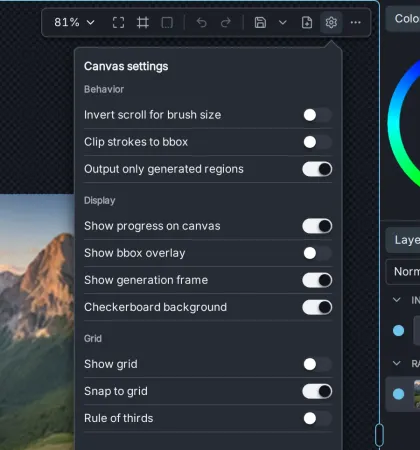
- Behavior
- Invert scroll for brush size — reverses Ctrl+scroll brush sizing.
- Clip strokes to bbox — keeps painting inside the generation frame.
- Output only generated regions — when on, an inpainting or outpainting result contains only the regenerated area, with the rest transparent; when off, it includes the whole frame.
- Display
- Show progress on canvas — shows the image forming while it generates.
- Show bbox overlay — dims everything outside the generation frame.
- Show generation frame — shows the frame’s dashed outline.
- Checkerboard background — shows transparent areas as a checkerboard.
- Grid
- Show grid — shows the model’s size grid.
- Snap to grid — snaps the generation frame, moves and transforms to the grid. Hold Alt to override it.
- Rule of thirds — shows composition guides inside the frame.
Saving and sharing a canvas
Section titled “Saving and sharing a canvas”The canvas belongs to its project and is saved with it automatically. To keep a finished image, use Save Canvas to Gallery or Save BBox to Gallery, or accept results and save individual layers with Save layer to uploads. To share a whole canvas, with its layers, masks and settings, export the project as an .invk file; see Projects.
Copying and pasting
Section titled “Copying and pasting”- Ctrl+C copies the selected pixels, and Ctrl+X cuts them.
- Ctrl+V pastes an image from the clipboard as a new raster layer at the generation frame.
- Ctrl+J duplicates the selected layer, or copies the selected pixels to a new layer.
Keyboard shortcuts
Section titled “Keyboard shortcuts”These shortcuts work while the canvas has focus. On macOS, use Cmd in place of Ctrl.
| Shortcut | Action |
|---|---|
| H, V, Ctrl+T, C, B, E, R, G, T, U, L | Select a tool (see Tools) |
| Hold Space | Pan temporarily |
| Hold Alt | Pick a color |
| [ / ] | Smaller / larger brush or eraser |
| X / D | Swap colors / reset colors to black and white |
| Ctrl+Z / Ctrl+Shift+Z, Ctrl+Y | Undo / redo |
| Ctrl+A / Ctrl+D / Ctrl+Shift+I | Select all / deselect / invert the selection |
| Ctrl+C / Ctrl+X / Ctrl+V | Copy / cut / paste |
| Delete | Erase the selection, or delete the selected layer |
| Shift+C | Clear the selected mask |
| Arrow keys (Shift: 10 px) | Nudge the selected layer |
| Ctrl+J / Ctrl+E | Duplicate layer / merge layer down |
| Ctrl+G / Ctrl+Shift+G | Group / ungroup layers |
| Ctrl+] / Ctrl+[ (add Shift for front / back) | Move layer forward / backward |
| Alt+[ / Alt+] | Previous / next layer, or staged result |
| Shift+H | Hide control, guidance and mask layers |
| Shift+N / Shift+B | Fit the generation frame to the layers / to the masks |
| Enter / Escape | Apply / cancel a transform, text or filter |
Some canvas commands listed in Settings → Hotkeys are marked Pending; they are not available yet.