Nodes#
Features in InvokeAI are added in the form of modular nodes systems called Invocations.
An Invocation is simply a single operation that takes in some inputs and gives out some outputs. We can then chain multiple Invocations together to create more complex functionality.
Invocations Directory#
InvokeAI Nodes can be found in the invokeai/app/invocations directory. These
can be used as examples to create your own nodes.
New nodes should be added to a subfolder in nodes direction found at the root
level of the InvokeAI installation location. Nodes added to this folder will be
able to be used upon application startup.
Example nodes subfolder structure:
├── __init__.py # Invoke-managed custom node loader
│
├── cool_node
│   ├── __init__.py # see example below
│   └── cool_node.py
│
└── my_node_pack
    ├── __init__.py # see example below
    ├── tasty_node.py
    ├── bodacious_node.py
    ├── utils.py
    └── extra_nodes
        └── fancy_node.py
Each node folder must have an __init__.py file that imports its nodes. Only
nodes imported in the __init__.py file are loaded. See the README in the nodes
folder for more examples:
Creating A New Invocation#
In order to understand the process of creating a new Invocation, let us actually create one.
In our example, let us create an Invocation that will take in an image, resize it and output the resized image.
The first set of things we need to do when creating a new Invocation are -
- Create a new class that derives from a predefined parent class called
BaseInvocation. - Every Invocation must have a
docstringthat describes what this Invocation does. - While not strictly required, we suggest every invocation class name ends in "Invocation", eg "CropImageInvocation".
- Every Invocation must use the
@invocationdecorator to provide its unique invocation type. You may also provide its title, tags and category using the decorator. - Invocations are strictly typed. We make use of the native typing library and the installed pydantic library for validation.
So let us do that.
from invokeai.invocation_api import (
    BaseInvocation,
    invocation,
)

@invocation('resize')
class ResizeInvocation(BaseInvocation):
    '''Resizes an image'''
That's great.
Now we have setup the base of our new Invocation. Let us think about what inputs our Invocation takes.
- We need an
imagethat we are going to resize. - We will need new
widthandheightvalues to which we need to resize the image to.
Inputs#
Every Invocation input must be defined using the InputField function. This is
a wrapper around the pydantic Field function, which handles a few extra things
and provides type hints. Like everything else, this should be strictly typed and
defined.
So let us create these inputs for our Invocation. First up, the image input we
need. Generally, we can use standard variable types in Python but InvokeAI
already has a custom ImageField type that handles all the stuff that is needed
for image inputs.
But what is this ImageField ..? It is a special class type specifically
written to handle how images are dealt with in InvokeAI. We will cover how to
create your own custom field types later in this guide. For now, let's go ahead
and use it.
from invokeai.invocation_api import (
    BaseInvocation,
    ImageField,
    InputField,
    invocation,
)

@invocation('resize')
class ResizeInvocation(BaseInvocation):

    # Inputs
    image: ImageField = InputField(description="The input image")
Let us break down our input code.
| Part | Value | Description |
|---|---|---|
| Name | image |
The variable that will hold our image |
| Type Hint | ImageField |
The types for our field. Indicates that the image must be an ImageField type. |
| Field | InputField(description="The input image") |
The image variable is an InputField which needs a description. |
Great. Now let us create our other inputs for width and height
from invokeai.invocation_api import (
    BaseInvocation,
    ImageField,
    InputField,
    invocation,
)

@invocation('resize')
class ResizeInvocation(BaseInvocation):
    '''Resizes an image'''

    image: ImageField = InputField(description="The input image")
    width: int = InputField(default=512, ge=64, le=2048, description="Width of the new image")
    height: int = InputField(default=512, ge=64, le=2048, description="Height of the new image")
As you might have noticed, we added two new arguments to the InputField
definition for width and height, called gt and le. They stand for
greater than or equal to and less than or equal to.
These impose constraints on those fields, and will raise an exception if the values do not meet the constraints. Field constraints are provided by pydantic, so anything you see in the pydantic docs will work.
Note: Any time it is possible to define constraints for our field, we should do it so the frontend has more information on how to parse this field.
Perfect. We now have our inputs. Let us do something with these.
Invoke Function#
The invoke function is where all the magic happens. This function provides you
the context parameter that is of the type InvocationContext which will give
you access to the current context of the generation and all the other services
that are provided by it by InvokeAI.
Let us create this function first.
from invokeai.invocation_api import (
    BaseInvocation,
    ImageField,
    InputField,
    InvocationContext,
    invocation,
)

@invocation('resize')
class ResizeInvocation(BaseInvocation):
    '''Resizes an image'''

    image: ImageField = InputField(description="The input image")
    width: int = InputField(default=512, ge=64, le=2048, description="Width of the new image")
    height: int = InputField(default=512, ge=64, le=2048, description="Height of the new image")

    def invoke(self, context: InvocationContext):
        pass
Outputs#
The output of our Invocation will be whatever is returned by this invoke
function. Like with our inputs, we need to strongly type and define our outputs
too.
What is our output going to be? Another image. Normally you'd have to create a
type for this but InvokeAI already offers you an ImageOutput type that handles
all the necessary info related to image outputs. So let us use that.
We will cover how to create your own output types later in this guide.
from invokeai.invocation_api import (
    BaseInvocation,
    ImageField,
    InputField,
    InvocationContext,
    invocation,
)

from invokeai.app.invocations.image import ImageOutput

@invocation('resize')
class ResizeInvocation(BaseInvocation):
    '''Resizes an image'''

    image: ImageField = InputField(description="The input image")
    width: int = InputField(default=512, ge=64, le=2048, description="Width of the new image")
    height: int = InputField(default=512, ge=64, le=2048, description="Height of the new image")

    def invoke(self, context: InvocationContext) -> ImageOutput:
        pass
Perfect. Now that we have our Invocation setup, let us do what we want to do.
- We will first load the image using one of the services provided by InvokeAI to load the image.
- We will resize the image using
PILto our input data. - We will output this image in the format we set above.
So let's do that.
from invokeai.invocation_api import (
    BaseInvocation,
    ImageField,
    InputField,
    InvocationContext,
    invocation,
)

from invokeai.app.invocations.image import ImageOutput

@invocation("resize")
class ResizeInvocation(BaseInvocation):
    """Resizes an image"""

    image: ImageField = InputField(description="The input image")
    width: int = InputField(default=512, ge=64, le=2048, description="Width of the new image")
    height: int = InputField(default=512, ge=64, le=2048, description="Height of the new image")

    def invoke(self, context: InvocationContext) -> ImageOutput:
        # Load the input image as a PIL image
        image = context.images.get_pil(self.image.image_name)

        # Resize the image
        resized_image = image.resize((self.width, self.height))

        # Save the image
        image_dto = context.images.save(image=resized_image)

        # Return an ImageOutput
        return ImageOutput.build(image_dto)
Note: Do not be overwhelmed by the ImageOutput process. InvokeAI has a
certain way that the images need to be dispatched in order to be stored and read
correctly. In 99% of the cases when dealing with an image output, you can simply
copy-paste the template above.
Customization#
We can use the @invocation decorator to provide some additional info to the
UI, like a custom title, tags and category.
We also encourage providing a version. This must be a semver version string ("\(MAJOR.\)MINOR.$PATCH"). The UI will let users know if their workflow is using a mismatched version of the node.
@invocation("resize", title="My Resizer", tags=["resize", "image"], category="My Invocations", version="1.0.0")
class ResizeInvocation(BaseInvocation):
    """Resizes an image"""

    image: ImageField = InputField(description="The input image")
    ...
That's it. You made your own Resize Invocation.
Result#
Once you make your Invocation correctly, the rest of the process is fully automated for you.
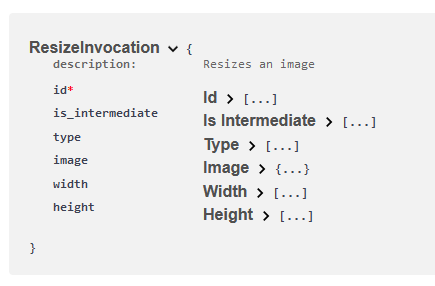
When you launch InvokeAI, you can go to http://localhost:9090/docs and see
your new Invocation show up there with all the relevant info.
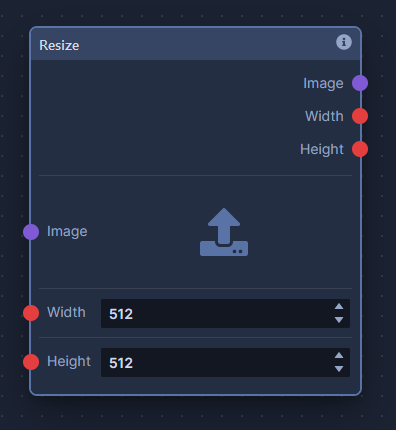
When you launch the frontend UI, you can go to the Node Editor tab and find your new Invocation ready to be used.
Contributing Nodes#
Once you've created a Node, the next step is to share it with the community! The best way to do this is to submit a Pull Request to add the Node to the Community Nodes list. If you're not sure how to do that, take a look a at our contributing nodes overview.
Advanced#
Custom Output Types#
Like with custom inputs, sometimes you might find yourself needing custom outputs that InvokeAI does not provide. We can easily set one up.
Now that you are familiar with Invocations and Inputs, let us use that knowledge
to create an output that has an image field, a color field and a string
field.
- An invocation output is a class that derives from the parent class of
BaseInvocationOutput. - All invocation outputs must use the
@invocation_outputdecorator to provide their unique output type. - Output fields must use the provided
OutputFieldfunction. This is very similar to theInputFieldfunction described earlier - it's a wrapper aroundpydantic'sField(). - It is not mandatory but we recommend using names ending with
Outputfor output types. - It is not mandatory but we highly recommend adding a
docstringto describe what your output type is for.
Now that we know the basic rules for creating a new output type, let us go ahead and make it.
from .baseinvocation import BaseInvocationOutput, OutputField, invocation_output
from .primitives import ImageField, ColorField

@invocation_output('image_color_string_output')
class ImageColorStringOutput(BaseInvocationOutput):
    '''Base class for nodes that output a single image'''

    image: ImageField = OutputField(description="The image")
    color: ColorField = OutputField(description="The color")
    text: str = OutputField(description="The string")
That's all there is to it.
Custom Input Fields#
Now that you know how to create your own Invocations, let us dive into slightly more advanced topics.
While creating your own Invocations, you might run into a scenario where the existing fields in InvokeAI do not meet your requirements. In such cases, you can create your own fields.
Let us create one as an example. Let us say we want to create a color input field that represents a color code. But before we start on that here are some general good practices to keep in mind.
Best Practices#
- There is no naming convention for input fields but we highly recommend that
you name it something appropriate like
ColorField. - It is not mandatory but it is heavily recommended to add a relevant
docstringto describe your field. - Keep your field in the same file as the Invocation that it is made for or in another file where it is relevant.
All input types a class that derive from the BaseModel type from pydantic.
So let's create one.
from pydantic import BaseModel

class ColorField(BaseModel):
    '''A field that holds the rgba values of a color'''
    pass
Perfect. Now let us create the properties for our field. This is similar to how you created input fields for your Invocation. All the same rules apply. Let us create four fields representing the red®, blue(b), green(g) and alpha(a) channel of the color.
Technically, the properties are also called fields - but in this case, it refers to a
pydanticfield.
class ColorField(BaseModel):
    '''A field that holds the rgba values of a color'''
    r: int = Field(ge=0, le=255, description="The red channel")
    g: int = Field(ge=0, le=255, description="The green channel")
    b: int = Field(ge=0, le=255, description="The blue channel")
    a: int = Field(ge=0, le=255, description="The alpha channel")
That's it. We now have a new input field type that we can use in our Invocations like this.
color: ColorField = InputField(default=ColorField(r=0, g=0, b=0, a=0), description='Background color of an image')
Using the custom field#
When you start the UI, your custom field will be automatically recognized.
Custom fields only support connection inputs in the Workflow Editor.